Snowflake, a powerful cloud data platform, excels at handling and analyzing vast volumes of data. But, like any other data warehouse or database, it is not immune to data duplication. While Snowflake supports unique, primary, and foreign key definitions, it does not enforce these constraints for standard tables (except for NOT NULL constraints, which are always enforced). This could lead to certain records being inserted more than once. There are a number of strategies that can be used to mitigate this issue.
In this article, we will cover everything you need to know about identifying and deleting duplicate data in Snowflake. We will first start by defining duplicate data, explain why it's problematic, and discuss methods to detect it. We'll also explore preventive measures and demonstrate how to delete duplicate records while loading CSV data into Snowflake. Let's dive right in!
Duplicate Snowflake Data: Causes and Solutions
Duplicate data is one of the primary data quality challenges in data platforms like Snowflake. Having multiple copies of the same data row compromises data accuracy and reliability, making it essential to regularly identify and remove duplicates.
What Causes Duplicate Data in Snowflake?
There are a few common causes of Snowflake data duplication:
Snowflake data duplication Cause 1: Human Error During Data Entry
Data duplication can occur due to human mistakes during data entry, such as accidentally entering the same information multiple times or copying and pasting data incorrectly.
Snowflake data duplication Cause 2: System Glitches and Software Bugs
Technical issues within a system or software can sometimes lead to duplicate data creation. It can happen when there are errors in data synchronization or when system processes fail to handle data properly.
Snowflake data duplication Cause 3: Data Integration and Migration Issues
During data integration or migration from one system to another, duplication can occur if mapping or transformation rules are not properly defined, or if there are inconsistencies in data formats between source and target systems.
Snowflake data duplication Cause 4: Multi-System Integration Without Deduplication
When importing or combining data from multiple sources, duplicates can be created if there is no matching process. The same entity may exist in both systems but with slightly different details.
Snowflake data duplication Cause 5: Lack of Enforced Primary Key Constraints
While Snowflake allows you to define primary and unique constraints, it does not enforce them for standard tables. If these constraints are not properly managed through other means, duplicates can emerge.
Note: Snowflake does not enforce these constraints, but if they are not properly implemented, duplicates can emerge.
What Are the Impacts of Snowflake Data Duplication?
The impacts of duplicate Snowflake data are significant and can severely undermine data-driven operations:
Snowflake data duplication Impact 1: Inaccurate Analytics and Inflated Metrics
Aggregate metrics and KPIs will be inflated and inaccurate with duplicate data. Analysis will also yield incorrect insights.
Snowflake data duplication Impact 2: Degraded Data Quality and Reliability
Duplicate data reduces the overall accuracy, completeness, and reliability of data, which in turn diminishes confidence in the data.
Snowflake data duplication Impact 3: Reduced Operational Efficiency
Data deduplication processes require additional time and resources, reducing operational efficiency and productivity.
Snowflake data duplication Impact 4: Increased Storage and Computing Costs
The costs to identify, resolve, and prevent duplicate data can be quite high especially if done manually. These costs diminishing the return on investment (ROI) for data initiatives.
Snowflake data duplication Impact 5: Poor Business Decision Making
Inaccurate data and analysis due to data duplication can lead to poor decision-making. When companies make decisions based on incomplete or incorrect information, it can negatively impact key business outcomes. For example, a business might launch a new product based on an inflated market size, leading to lost sales, wasted marketing spend, and other financial losses.
Save up to 30% on your Snowflake spend in a few minutes!


How to Delete Duplicate Records in Snowflake: 5 Proven Methods
Data integrity is essential for effective analysis in Snowflake. Duplicate records can cause serious problems, resulting in incorrect insights and poor decisions. Luckily, Snowflake offers some useful tools for identifying and removing troublesome duplicates.
Here are some of the key methods available in Snowflake to identify and delete duplicate records:
Method 1: Using Snowflake DISTINCT
One straightforward way to weed out or delete duplicate records in Snowflake is by using the Snowflake DISTINCT keyword alongside the SELECT command to extract only distinct (unique) values from a dataset. So, by only picking columns with the DISTINCT keyword, Snowflake returns only unique records, removing duplicates.
For example;
Let's start by creating a sample table and inserting some dummy data for testing purposes.
CREATE OR REPLACE TABLE STUDENT_RECORD (
STUDENT_ID NUMBER(6,0),
FIRST_NAME VARCHAR2(20),
LAST_NAME VARCHAR2(20),
AGE NUMBER(3,0),
ADDRESS VARCHAR2(100),
PHONE_NUMBER VARCHAR2(20),
GRADE VARCHAR2(10)
);

INSERT INTO STUDENT_RECORD(STUDENT_ID, FIRST_NAME, LAST_NAME, AGE, ADDRESS, PHONE_NUMBER, GRADE) VALUES
(1, 'John', 'Cena', 18, '123 Main St, City', '123-456-7890', 'A'),
(1, 'John', 'Cena', 18, '123 Main St, City', '123-456-7890', 'A'),
(2, 'Rock', 'Bottom', 17, '456 Second St, Town', '987-654-3210', 'B'),
(2, 'Rock', 'Bottom', 17, '456 Second St, Town', '987-654-3210', 'B'),
(2, 'Rock', 'Bottom', 17, '456 Second St, Town', '987-654-3210', 'B'),
(3, 'James', 'Johnson', 16, '789 Oak St, Village', '456-123-7890', 'C'),
(3, 'James', 'Johnson', 16, '789 Oak St, Village', '456-123-7890', 'C'),
(4, 'Sarah', 'Williams', 18, '321 Pine St, County', '789-123-4560', 'A');

SELECT * FROM STUDENT_RECORD;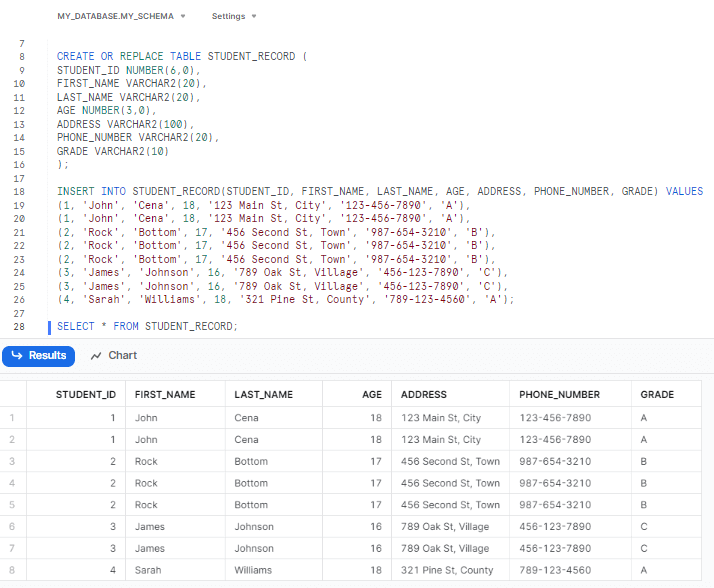
Let’s retrieve unique records from the table. To do so, simply type in the following query.
SELECT DISTINCT * FROM STUDENT_RECORD;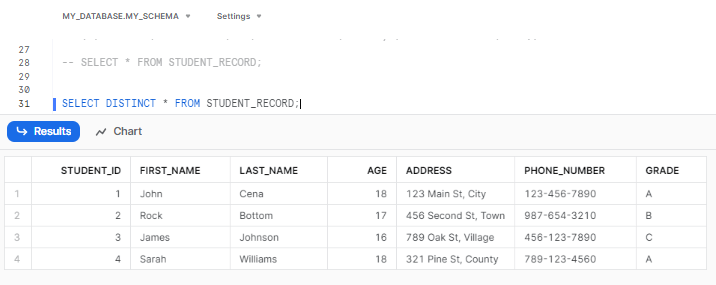
Now, let’s go a bit further and refine the student records and remove any duplicates.
First, let's create a separate table called refined_student_record by selecting distinct records from the student_record table. This will create a new table with unique records.
CREATE OR REPLACE TABLE refined_student_record AS SELECT DISTINCT * FROM student_record;Next, we will rename the original student_record table to student_record_not_refined. This step is optional but can be useful if you want to keep a backup of the original data.
ALTER TABLE student_record RENAME TO student_record_not_refined;Then, we will rename the refined_student_record table to student_record, effectively replacing the original table with the refined version.
ALTER TABLE refined_student_record RENAME TO student_record;Lastly, we can verify the changes by selecting all records from the student_record table, which now contains the refined and deduplicated data.
SELECT * FROM student_record;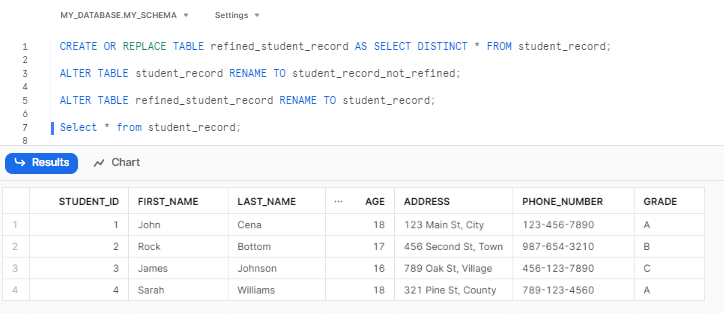
Method 2: Using Snowflake ROW NUMBER() function
The Snowflake ROW NUMBER function is an analytic function that assigns a unique sequential number to each row within a specified partition of the result set. Using this function, you can assign row numbers to records and then filter for rows with a row number of 1, effectively removing duplicates. This method is particularly useful when you want to eliminate duplicates based on specific column combinations, keeping only one instance.
Now, let's write a query utilizes the Snowflake ROW NUMBER() analytic function to assign row numbers to each unique set of records based on the specified columns:
 SELECT
    STUDENT_ID,
    FIRST_NAME,
    LAST_NAME,
    AGE,
    ADDRESS,
    PHONE_NUMBER,
    GRADE,
  ROW_NUMBER() OVER(PARTITION BY STUDENT_ID, FIRST_NAME, LAST_NAME, AGE, ADDRESS, PHONE_NUMBER, GRADE ORDER BY STUDENT_ID) AS ROW_NUMBER
FROM student_record_not_refined;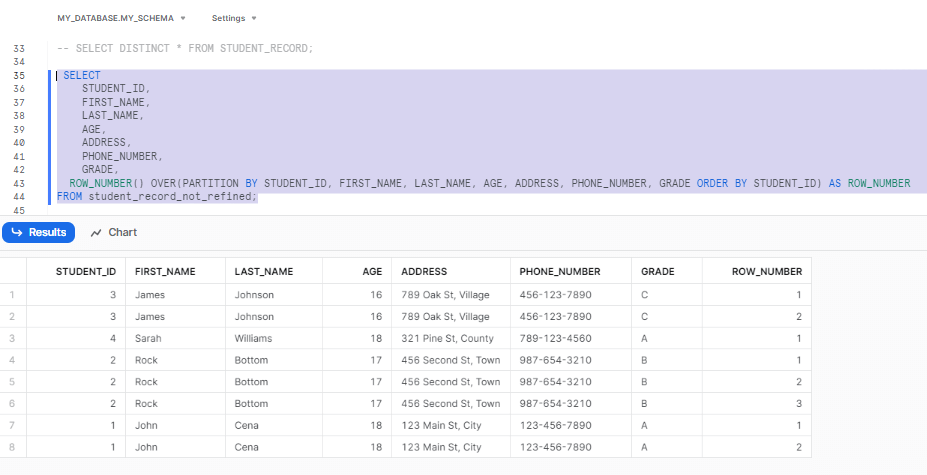
After assigning row numbers to the records, you can extract the unique records from the table by querying the rows with a row number of 1.
The SQL query below shows how to extract unique records from the student_record_not_refined table using the Snowflake ROW NUMBER analytic function:
SELECT
  STUDENT_ID,
  FIRST_NAME,
  LAST_NAME,
  AGE,
  ADDRESS,
  PHONE_NUMBER,
  GRADE
FROM (
  SELECT
    STUDENT_ID,
    FIRST_NAME,
    LAST_NAME,
    AGE,
    ADDRESS,
    PHONE_NUMBER,
    GRADE,
    ROW_NUMBER() OVER (PARTITION BY STUDENT_ID, FIRST_NAME, LAST_NAME, AGE, ADDRESS, PHONE_NUMBER, GRADE ORDER BY STUDENT_ID) AS ROW_NUMBER
  FROM student_record_not_refined
) AS subquery
WHERE ROW_NUMBER = 1;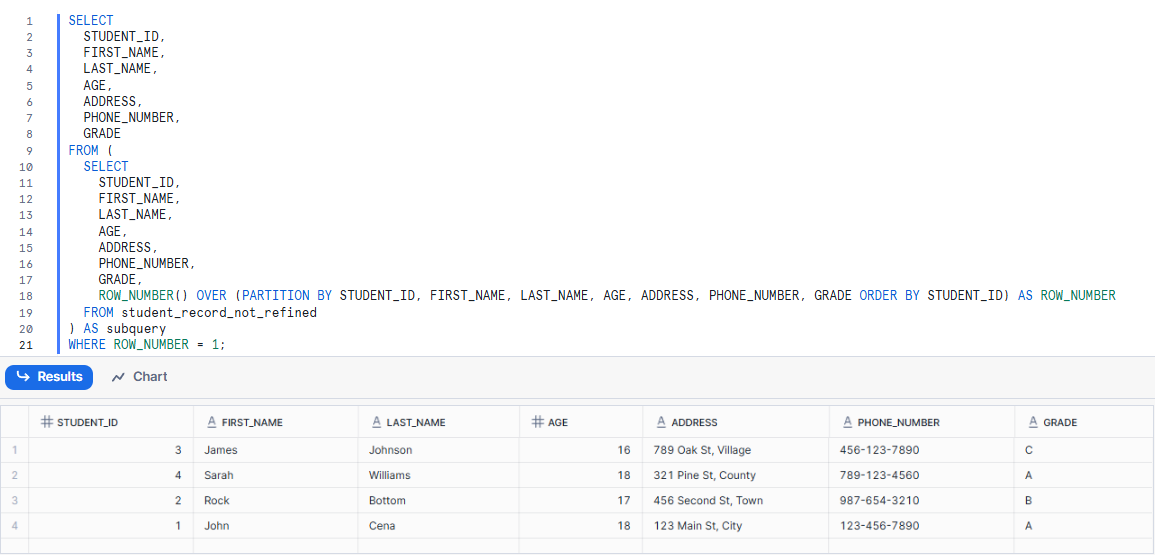
As you can see, the inner subquery picks all columns from the student_record_not_refined table and adds the additional column Snowflake ROW NUMBER() OVER (...) AS ROW_NUMBER, which assigns row numbers to each unique set of records depending on the specified columns. The outer query then retrieves the columns STUDENT_ID, FIRST_NAME, LAST_NAME, AGE, ADDRESS, PHONE_NUMBER, and GRADE from the subquery. And finally, the WHERE clause filters the results to only include rows where the ROW_NUMBER column is equal to 1, successfully extracting the unique records.
Using the QUALIFY Clause for Efficient Deduplication
Snowflake's QUALIFY clause is a powerful and elegant feature specifically designed to filter results of window functions, much like HAVING filters aggregate functions.
QUALIFY clause significantly simplifies queries that involve window functions for deduplication, eliminating the need for subqueries or Common Table Expressions (CTEs) when filtering on the output of functions like ROW_NUMBER().
QUALIFY is evaluated after window functions are computed in the query execution order.
The QUALIFY clause makes the ROW_NUMBER() method even more concise and readable. Instead of nesting a SELECT statement to filter on the ROW_NUMBER alias, you can apply the filter directly using QUALIFY.
Let's revisit the ROW_NUMBER() example and apply the QUALIFY clause to achieve the same result of identifying unique records.
SELECT
    STUDENT_ID,
    FIRST_NAME,
    LAST_NAME,
    AGE,
    ADDRESS,
    PHONE_NUMBER,
    GRADE
FROM student_record_not_refined
QUALIFY ROW_NUMBER() OVER (PARTITION BY STUDENT_ID, FIRST_NAME, LAST_NAME, AGE, ADDRESS, PHONE_NUMBER, GRADE ORDER BY STUDENT_ID) = 1;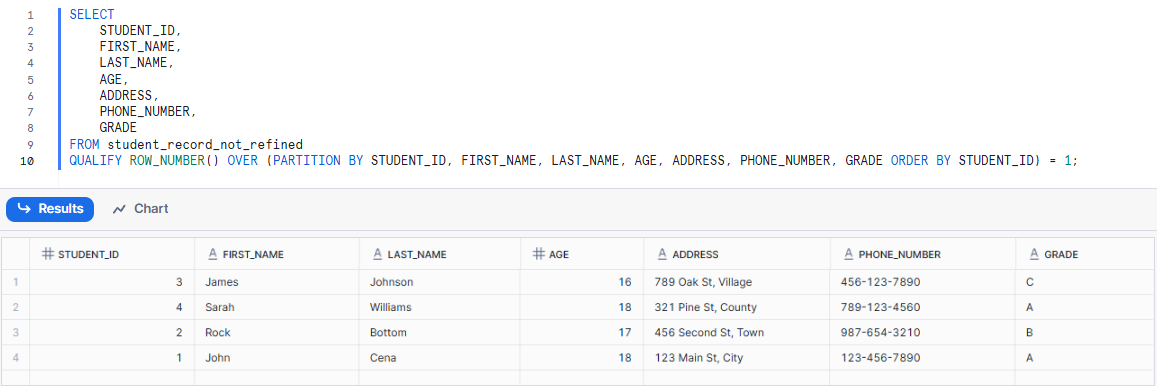
Method 3: Using Snowflake SWAP WITH command
The Snowflake SWAP WITH command in Snowflake allows for the swapping of content and metadata between two specified tables, including integrity constraints, which involves creating a new table with the same structure as the original table, inserting unique records into the new table, and then swapping the data between the two tables. This method is very useful to efficiently delete duplicate records in Snowflake from large datasets.
Let’s create a new table with the same structure as the source table.
Use the CREATE TABLE LIKE statement to create the STUDENT_RECORD_MIRROR table with the same structure as the STUDENT_RECORD_NOT_REFINED table, but without any records or data.
CREATE OR REPLACE TABLE student_record_mirror LIKE student_record_not_refined;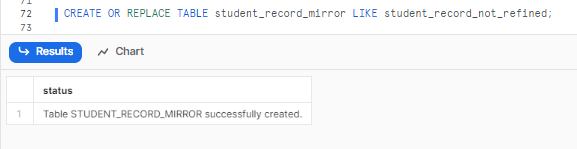
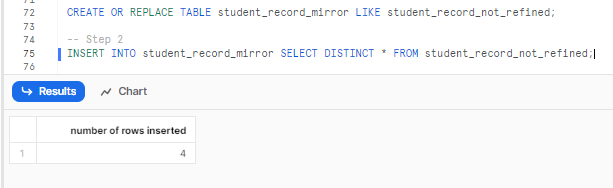
Now, insert unique records into the newly created table. Make sure to use the INSERT INTO statement to select distinct records from the STUDENT_RECORD_NOT_REFINED table and insert them into the STUDENT_RECORD_MIRROR table.
INSERT INTO student_record_mirror SELECT DISTINCT * FROM
student_record_not_refined;
Finally, Swap the data between the two tables. Use the Snowflake SWAP WITH command to swap the data and metadata between the STUDENT_RECORD_NOT_REFINED and STUDENT_RECORD_MIRRORR tables. This operation is performed in a single transaction.
ALTER TABLE student_record_mirror SWAP WITH student_record_not_refined;
select * from student_record_not_refined;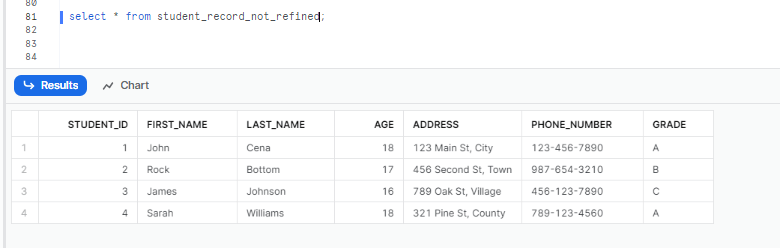
Method 4: Using OVERWRITE command
Alternatively, you can use the Snowflake INSERT statement with the Snowflake OVERWRITE command to insert unique records directly into the student record table, which eliminates the need for creating an intermediate table and swapping data. The existing data in the table will be truncated before inserting the unique records.
Let’s first test our table has un-refined data or not. To do so, just select all from our unrefined table.
select * from student_record_not_refined_2;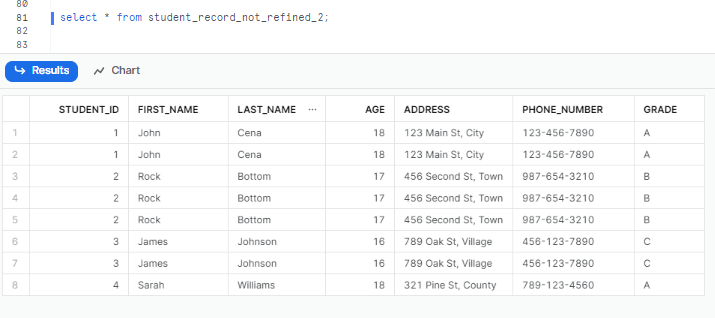
Now, lets overwrite it.
INSERT OVERWRITE INTO student_record_not_refined_2 SELECT DISTINCT * FROM student_record_not_refined_2;
select * from student_record_not_refined_2;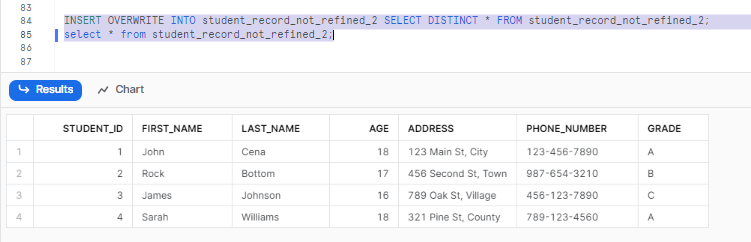
Method 5: Using Third-party tools to check Snowflake data quality
Apart from the built-in features, functionalities and commands provided by Snowflake, there are various third-party Snowflake tools available that specialize in data quality and deduplication. These tools include:
These tools offer exceptional functionalities to efficiently identify and delete duplicate data. So by carefully using these tools, you can benefit from flexibility and customization options tailored to their specific data management needs. These third-party tools provide enhanced capabilities and can boost Snowflake's native capabilities, allowing for comprehensive and efficient duplicate data management.
Performance Benchmarks for Each Deduplication Method
Selecting the right deduplication method in Snowflake directly impacts performance, especially with large datasets. Getting to know how each method works can really keep your data running smoothly.
▶ SELECT DISTINCT (for generating a new table):
| 🔮 Performance | 🔮 Considerations |
|---|---|
| Generally efficient for creating a new, deduplicated table. Snowflake's architecture is optimized for scanning and filtering data. Creating a new table with SELECT DISTINCT reads the source table once and writes the unique results to a new, optimized micro-partition structure. It is often highly performant because it avoids in-place updates or complex row-by-row operations. | Requires sufficient storage for the temporary new table. The entire dataset needs to be scanned and processed. This method is effective for batch processing or when a complete rewrite of the table is acceptable. It's often combined with ALTER TABLE SWAP WITH for atomic replacement. |
▶ ROW_NUMBER() with QUALIFY (for DELETE or SELECT):
| 🔮 Performance | 🔮 Considerations |
|---|---|
|
Offers fine-grained control over which duplicate to keep (based on the ORDER BY clause within ROW_NUMBER()). If the dataset is enormous and DELETE becomes slow, consider the SWAP WITH strategy using QUALIFY to create the new table. For large tables, DELETE can accumulate "ghost data" (deleted rows still occupying storage) until the table is sufficiently re-written or clustered, potentially impacting storage costs and scan performance. |
▶ SWAP WITH (using a temporary table):
| 🔮 Performance | 🔮 Considerations |
|---|---|
| Exceptionally fast and atomic. The ALTER TABLE ... SWAP WITH ... command is a metadata-only operation that completes almost instantaneously, regardless of table size. The performance bottleneck shifts to the CREATE TABLE AS SELECT DISTINCT or CREATE TABLE AS SELECT ... QUALIFY step, which generates the deduplicated temporary table. | Requires creating a temporary table that can be as large as the original table, temporarily doubling storage consumption (or more, if the source table also has significant Time Travel/Fail-safe data). This is the recommended approach for large-scale, in-place deduplication where downtime must be minimized and atomicity is critical, providing a near-zero downtime table replacement. |
▶ INSERT OVERWRITE:
| 🔮 Performance | 🔮 Considerations |
|---|---|
| Similar to the SWAP WITH strategy in terms of the underlying data processing. The SELECT DISTINCT part is the compute-intensive phase. The OVERWRITE clause effectively truncates the target table and then inserts the results, making it an atomic operation for the target table (meaning the table is either fully overwritten or not at all). | Also requires a full table rewrite, meaning the entire dataset is processed and reinserted. It can be simpler to code than SWAP WITH if a temporary table rename isn't strictly necessary. It consumes similar compute resources during the SELECT DISTINCT phase as creating a new table. Similar to SWAP WITH, it effectively replaces the old table's content with new, distinct data. |
▶ COPY INTO with SELECT DISTINCT (during loading):
| 🔮 Performance | 🔮 Considerations |
|---|---|
| Performs deduplication during the ingestion process, which can be highly efficient as it avoids a separate post-load deduplication step. Snowflake can optimize this by processing distinct records directly from staged files. | Ideal for preventing duplicates at the point of entry. It does not address duplicates that already exist in the target table. It requires careful handling of file formats and column mappings. |
Summary:
| Method | Primary Operation Cost | Speed for Large Datasets | Atomicity | Storage Overhead (Temporary) | Use Case |
| SELECT DISTINCT (to new table) | Full table scan & write | Fast | Yes | High (new table) | Batch deduplication, creating clean snapshots |
| DELETE with QUALIFY | Marking partitions for deletion | Moderate to Slow (large scale) | No | Low | Small to medium tables, targeted deletions where specific duplicates need to be removed. |
| SWAP WITH (after CREATE AS) | Full table scan & write (for temp) | Very Fast (swap) | Yes | High (temp table) | Large tables, critical production systems requiring atomic table replacement and minimal downtime. |
| INSERT OVERWRITE | Full table scan & write | Fast | Yes | Moderate (staging) | Large tables, simpler in-place rewrite of a table's entire content. |
| COPY INTO with SELECT DISTINCT | File scan & write (during ingestion) | Fast (during load) | Yes | Low | Deduplication at ingestion time, preventing duplicates from ever entering the final target table. |
How to Prevent Duplicate Data in Snowflake?
So, how do you prevent data duplication issues in Snowflake? Welp!! There are several strategies you can employ, they are:
Strategy 1: Standardize Data Entry Procedures
Establishing clear guidelines and enforcing consistent data entry formats can minimize the chaos of duplicate entries.
Strategy 2: Implement Validation Rules at Ingestion
Applying validation rules and constraints during data entry or during the ETL/ELT process can prevent duplicate records from being created.
Strategy 3: Use Unique Identifiers for All Records
Assigning unique identifiers to records ensures their uniqueness and helps in identifying and eliminating duplicates.
Strategy 4: Automate Data Quality Checks
Automating data cleaning processes can significantly reduce the occurrence of duplicate data. This involves implementing data quality tools or scripts that regularly scan and clean the data, identifying and removing duplicates.
Strategy 5: Conduct Regular Data Audits
Conducting regular data audits is crucial for identifying and addressing duplicate data. Audits help in detecting duplicate records, understanding the root causes, and implementing necessary measures to prevent their future occurrence.
Delete Duplicate Record in Snowflake—Hands-on Example:
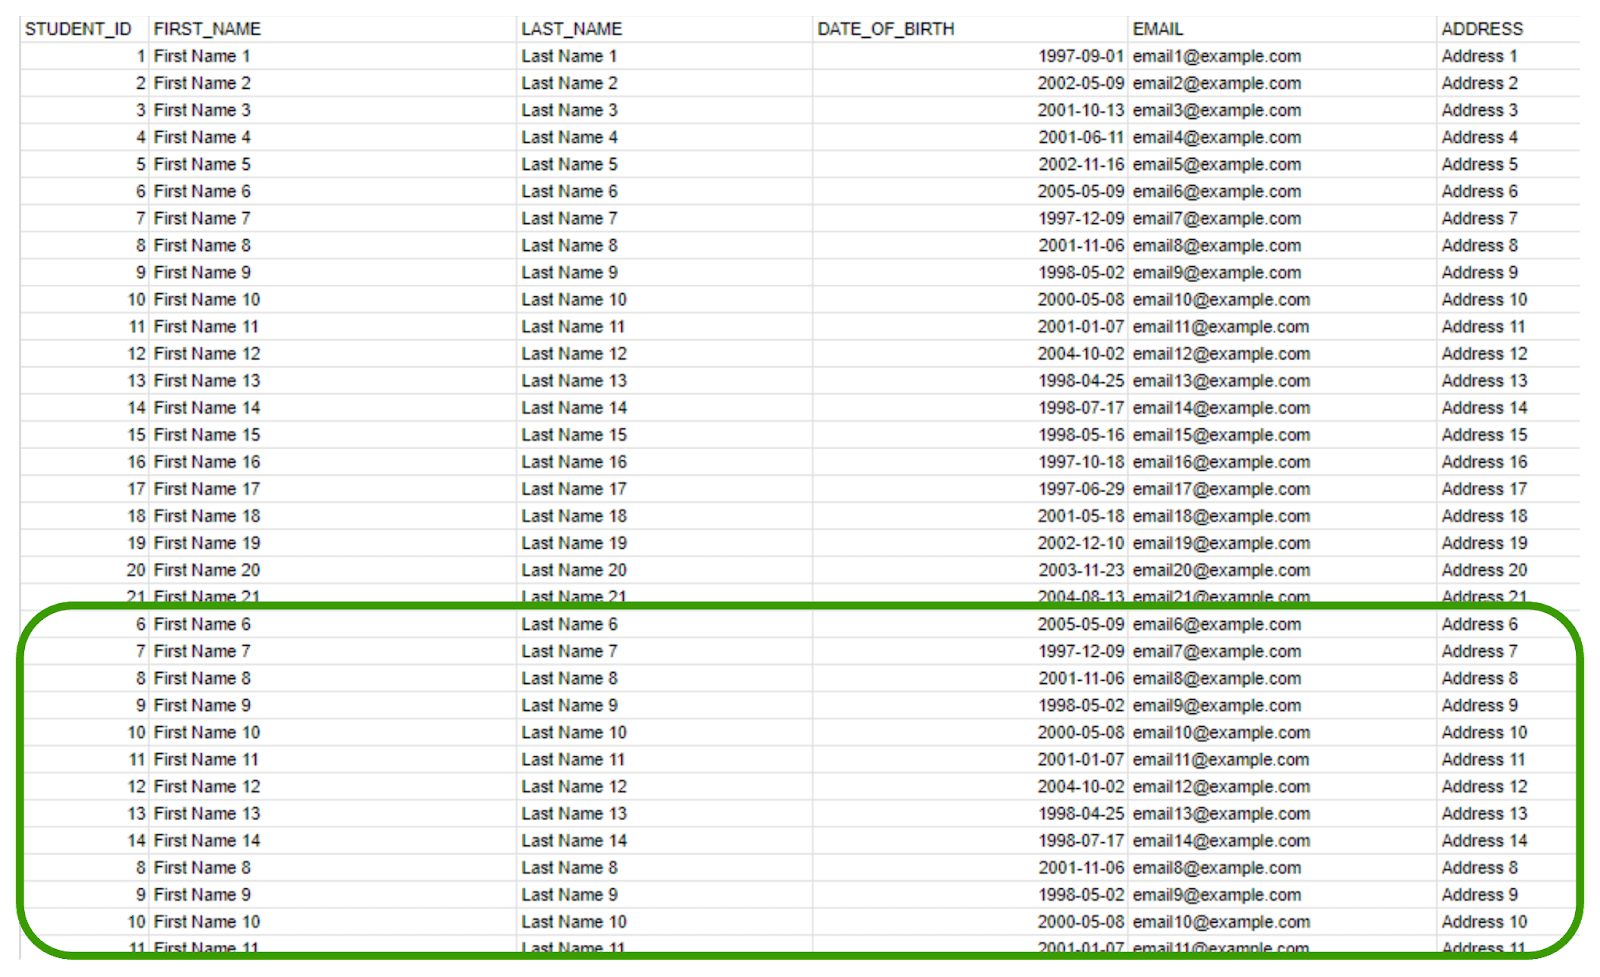
Now, let's explore a hands-on example of loading a demo CSV file that contains duplicate records. We will refine the data before loading it into the table. Follow these steps carefully to proceed:
Here is the sample of what our CSV record looks like:
To begin, we will load our CSV file into Snowflake using Snowsight. There are multiple methods to accomplish this task, such as using a Snowflake external stage or a Snowflake managed stage (internal stage). For this tutorial, we will create a Snowflake managed stage (internal stage) in Snowsight and load the CSV file into it. Follow the steps below:
Here are the steps to follow to upload CSV to Snowflake using internal stage:
Step 1: Log Into Snowsight Interface
Step 2: Head over to the navigation menu, select "Data" and then click on "Databases", which will display a list of available databases.
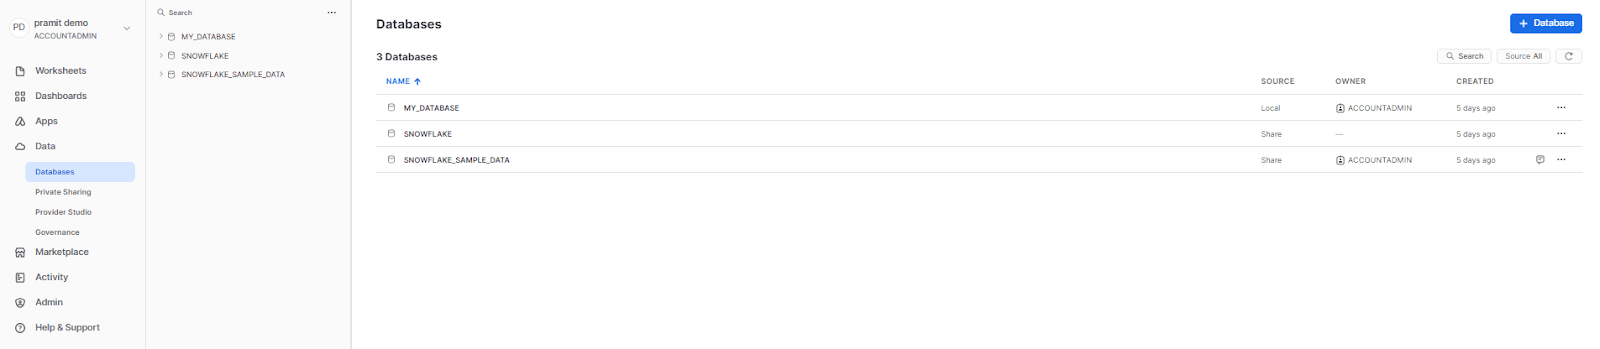
Step 3: Select the desired database and schema from the list to set the context for your data loading process.
Step 4: Choose the stage option and click on "Snowflake Managed" stage.
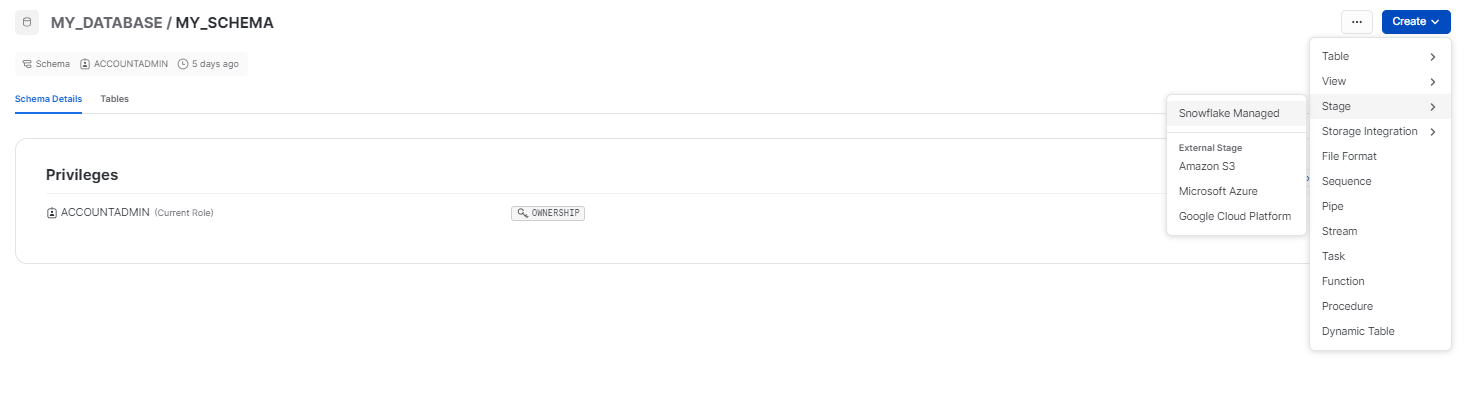
Step 5: Enter a Stage Name. In the "Stage Name" field, provide a descriptive name for your stage. Then, decide whether to enable or disable the directory table. It is important to note that the directory table stores file-level metadata regarding the data files in the stage. Lastly, select your preferred encryption type, either "Client-side" or "Server-side".
Note: Once the stage is created, your chosen encryption type will be permanent and cannot be modified.
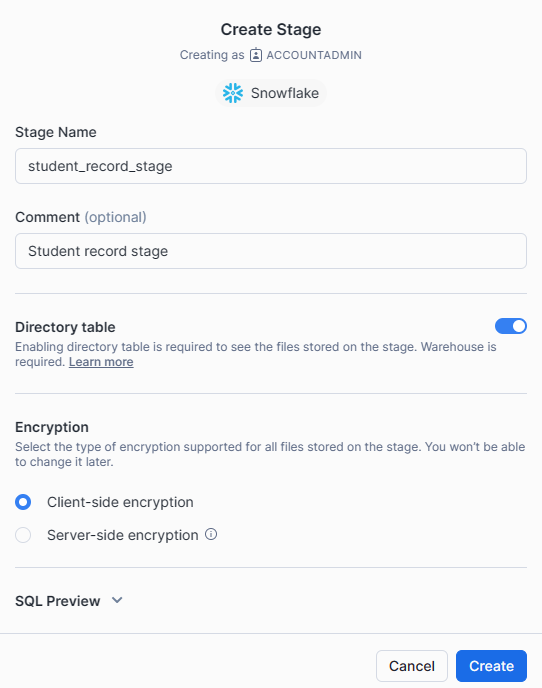
Step 6: Click the "Create" button to create the Snowflake Managed stage.
Step 7: Choose the CSV file to load into the Snowflake stage.
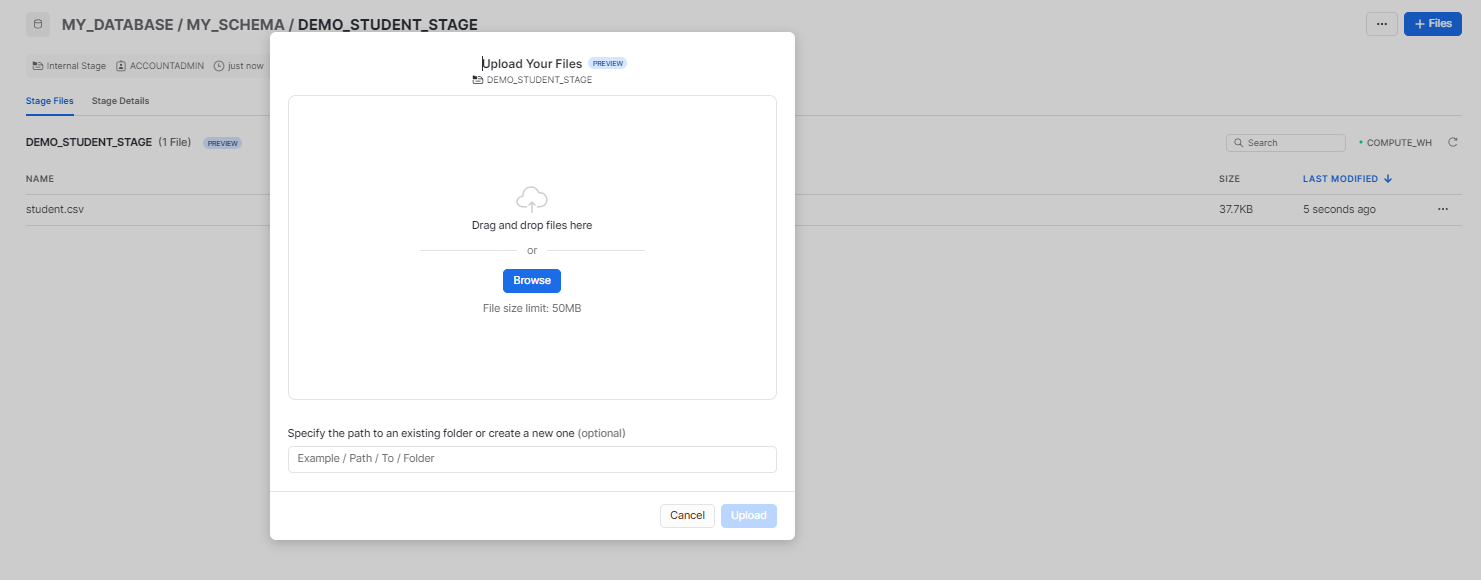
Step 8: After successfully uploading the CSV file, navigate to the worksheet and enter the following command to verify if the CSV file has been loaded.
list '@"MY_DATABASE"."MY_SCHEMA"."STUDENT_RECORD_STAGE"/Student_record.csv';
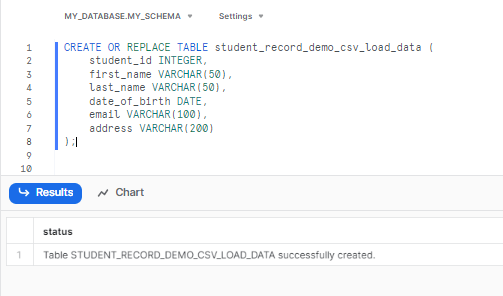
Step 9: Now, let's create a table using the CREATE TABLE statement that matches the structure of your CSV file.
Run the following command to create the table:
CREATE OR REPLACE TABLE student_record_demo_csv_load_data (
    student_id INTEGER,
    first_name VARCHAR(50),
    last_name VARCHAR(50),
    date_of_birth DATE,
    email VARCHAR(100),
    address VARCHAR(200)
);
Step 10: Create a FILE FORMAT. Run the following command to create a file format:
CREATE or REPLACE FILE FORMAT student_record_csv_file_format
type = 'csv'
compression = 'none'
field_delimiter = ','
record_delimiter = '\n'
skip_header = 1 
Step 11: Now that you have created the file format, let's check the table to see if there is any data. If the console displays "query produced no result", it means there is no data in the table.
select * from student_record_demo_csv_load_data;
Step 12: Finally, to load the data from the stage into a Snowflake table you can use the COPY INTO command. Choose the appropriate command based on your requirements:
To load data as it is organized in the CSV file:
copy into student_record_demo_csv_load_data
    from '@"MY_DATABASE"."MY_SCHEMA"."STUDENT_RECORD_STAGE"/Student_record.csv'
    file_format = student_record_csv_file_format
    force = true
    on_error = 'continue';
Step 13: Now, if you select everything from the table, you will be able to see all of your data. However, the issue of duplication still persists. In the next step, we will address this problem.
select * from student_record_demo_csv_load_data;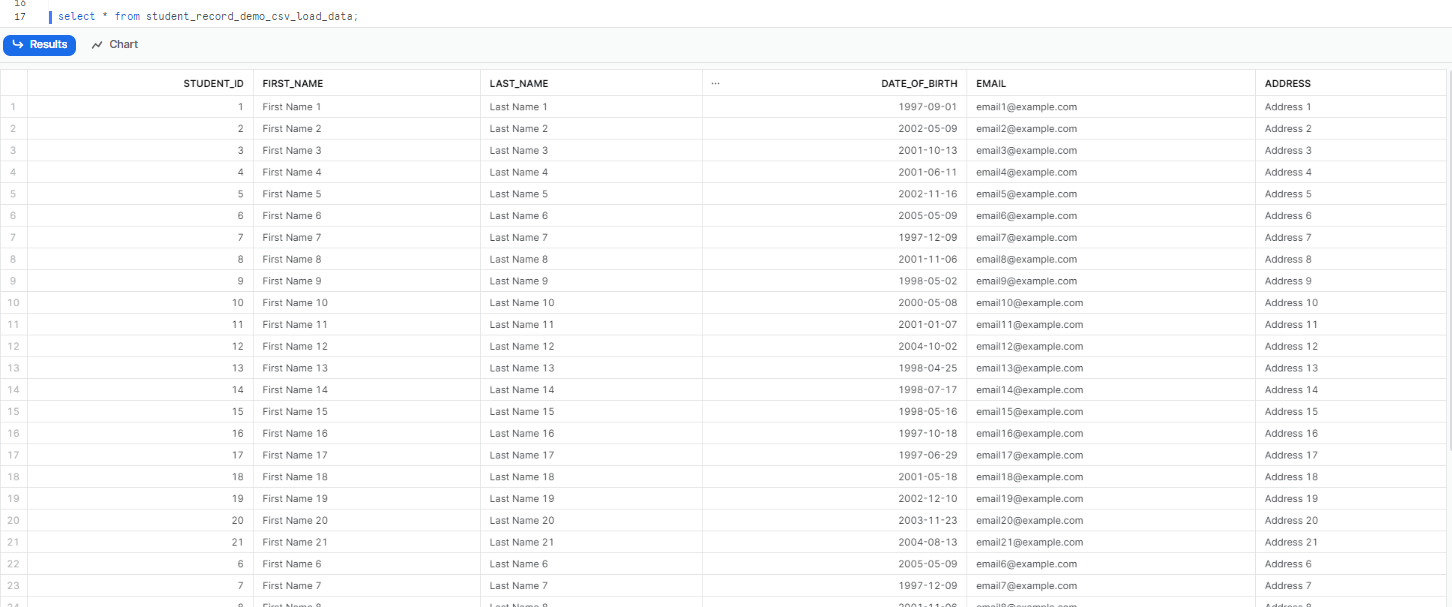
Step 14: Truncate the table to remove all existing records.
truncate table student_record_demo_csv_load_data;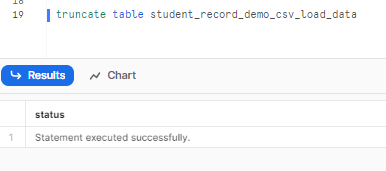
Step 15: To remove the duplicates while copying the data from the CSV file to the Snowflake table, execute the following query:
copy into student_record_demo_csv_load_data
    from
    (
    select distinct * from '@"MY_DATABASE"."MY_SCHEMA"."STUDENT_RECORD_STAGE"/Student_record.csv'
    )
    file_format = student_record_csv_file_format
    force = true
    on_error = 'continue';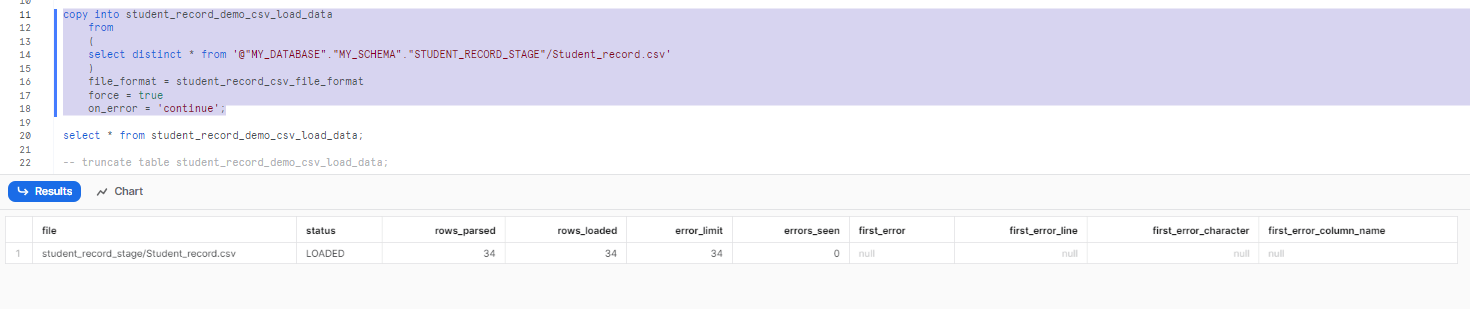
This particular query removes duplicates by selecting distinct records from the CSV file and then copies the refined data into the designated Snowflake table.
select * from student_record_demo_csv_load_data;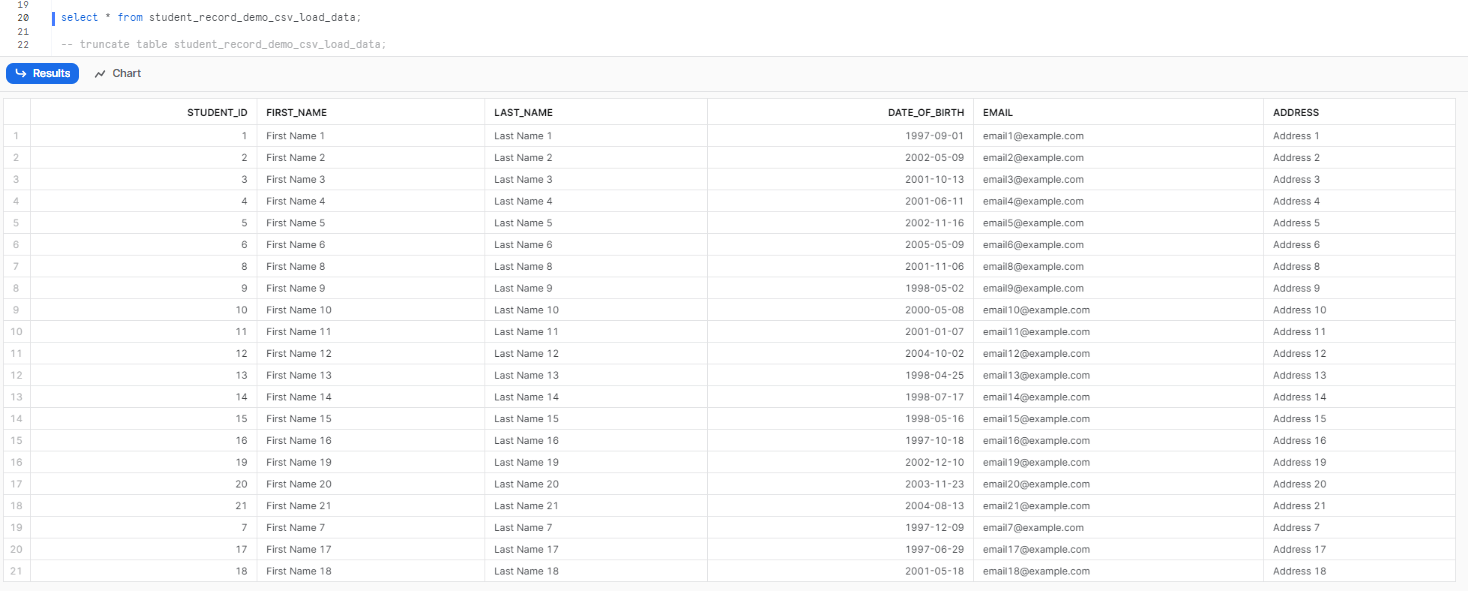
Congratulations! As you can see, there are no more duplicate data entries. Just like this, you can effortlessly delete duplicate data from your dataset using the provided method. It's a simple and effective way to ensure data integrity and accuracy.
Want to take Chaos Genius for a spin?
It takes less than 5 minutes.

Conclusion
In conclusion, getting rid of duplicate data in Snowflake is a lot like gardening. You have to find the "weeds" (duplicates) and use the right tools to get rid of them. To address this issue, we explored methods such as using the DISTINCT keyword, the Snowflake ROW_NUMBER() function, and the Snowflake SWAP WITH command to identify and eliminate duplicates in Snowflake. So by carefully following these strategies, you can make sure your data garden remains healthy and productive.
Remember, it's easier to stop weeds from growing in the first place, so take steps to keep your data tidy from the start. Now you have the knowledge to keep your Snowflake data clean, making it a great source for all your data analysis needs.
FAQs
What is duplicate data?
Duplicate data are records that contain the same or similar information. They can occur in Snowflake tables for a variety of reasons, such as human error, data entry errors, or system failures.
Why is it important to identify and delete duplicate data?
Duplicate data can cause a number of problems, including:
- Inaccuracy: Duplicate data can lead to inaccurate reports and analyses.
- Wasted space: Duplicate data can take up unnecessary space in Snowflake tables.
- Performance issues: Duplicate data can slow down queries and operations.
- Data security risks: Duplicate data can increase the risk of data breaches and other security incidents.
What is duplicate data in Snowflake?
Duplicate data refers to multiple copies of the same data row or record existing within Snowflake tables or datasets, which can reduce data accuracy and reliability.
What are the impacts of duplicate data in Snowflake?
Duplicate data can lead to inaccuracies in data analysis and reporting. It can also consume unnecessary storage space, leading to increased costs and inefficient data management.
Does Snowflake support unique, primary, and foreign keys?
Yes, Snowflake supports unique, primary, and foreign keys. However, it does not enforce these constraints (except for NOT NULL constraints), which can lead to the insertion of duplicate rows.
How can you delete duplicate data in Snowflake?
You can remove duplicate data in Snowflake using methods like the DISTINCT keyword, ROW_NUMBER() function, SWAP WITH command, OVERWRITE command, or leveraging third-party data quality tools.
How can you prevent duplicate data from occurring in Snowflake?
You can prevent duplicate data by standardizing data entry, implementing validation rules and constraints, assigning unique identifiers, setting up automated data cleaning processes, and conducting regular data audits.
Can third-party tools help with duplicate data management in Snowflake?
Yes, third-party tools like Talend, Dataiku, FirstEigen, and Trifacta can provide enhanced capabilities and flexibility for identifying and eliminating duplicate data in Snowflake.
Is there a way to remove duplicates while loading data from a CSV file into Snowflake?
Yes, you can use the COPY INTO command with the DISTINCT keyword to select distinct records from the CSV file and load them into the Snowflake table, effectively removing duplicates during the load process.
What is the QUALIFY clause used for in Snowflake deduplication?
The QUALIFY clause is used with window functions (like ROW_NUMBER()) to filter rows after the window function has been applied. It offers a concise and efficient way to directly target and delete duplicate records identified by these functions without needing nested subqueries.