Making informed data-driven decisions requires the sharing and analysis of data. Traditional data-sharing methods lack the necessary privacy and security. Secure data sharing allows people within an organization to participate in data analysis without sharing sensitive info or compromising data privacy. Seeing the need for more security in data collaboration Snowflake has developed Snowflake Data Clean Rooms, which is a controlled environment where multiple users can analyze combined datasets without exposing raw data to each other.
In this article, we'll cover everything you need to know about Snowflake Data Clean Rooms. We’ll explore what they are, how they work, and why they’re so important for data sharing and collaboration. Additionally, we’ll guide you through setting up a Snowflake Data Clean Room, discuss its features and benefits, and even address its limitations and challenges.
Unpacking the Concept of Data Sharing
Data sharing—in its simplest form—refers to the practice of making data accessible to other parties, whether within the same company or across companies. In today's digital ecosystem, data sharing serves as a critical enabler for cross-functional collaboration, data-driven innovation, and evidence-based decision-making.
Data sharing traditionally involves methods like FTP file transfers, ETL pipelines, and API integrations. These methods often lead to collaboration inefficiencies, data inaccuracies and security vulnerabilities. Traditional data sharing methods can be costly, difficult to govern, and prone to creating data silos.
Want to take Chaos Genius for a spin?
It takes less than 5 minutes.
The Need for Secure Data Sharing
As the world gets digital day by day, the need for secure data sharing becomes more obvious. Secure data sharing is imperative when dealing with sensitive information that requires privacy and security, such as when collaborating across business units or with external partners. This enables informed decision-making and data monetization with secure and revocable access to data, ensuring compliance and data integrity. That's where Snowflake Data Clean Rooms come in, providing a secure environment for data collaboration within the Snowflake ecosystem.
What Is Snowflake Data Clean Rooms?
We know traditional data sharing has its limits. That’s why Snowflake has created a next-gen solution with Snowflake Data Clean Rooms. Snowflake Data Clean Rooms is a secure and controlled environment where multiple parties can analyze combined datasets without exposing raw data to each other.
Here’s how it works: All analyses are conducted within the secure environment of the Snowflake Data Clean Room. Collaborators can extract insights and aggregated results but can’t directly access or query the raw data. The data owner controls what analyses are available to other collaborators so their data is used exactly as intended.
Snowflake Data Clean Rooms uses advanced privacy-enhancing techniques:
- Differential privacy: This method adds a controlled amount of statistical noise to the results, making it extremely difficult to determine if a specific individual is included in the dataset.
- Encrypted computations: Data remains encrypted, and analyses are performed directly on this encrypted information using secure multi-party computation techniques.
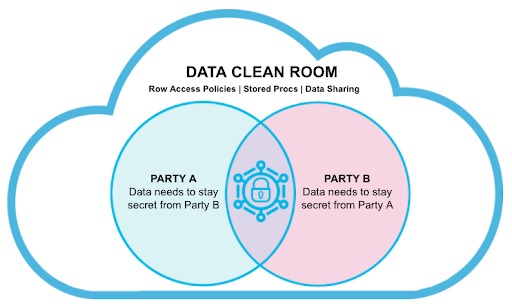
Snowflake Data Clean Rooms leverage core Snowflake collaboration and data governance features to ensure secure data matching and analysis.
- Row Access Policies and database roles enable parties to match customer data without exposing personally identifiable information (PII).
- Stored Procedures are used to generate and validate query requests, ensuring the integrity and accuracy of the data analysis process.
- Secure Data Sharing facilitates the automatic and secure sharing of tables across Snowflake accounts, eliminating the need for data movement and enhancing data protection.
Snowflake Data Clean Rooms operate on a provider-consumer model like Secure Data Sharing. The data owner (provider) shares data with you (the consumer). You can then install the Clean Room in your own account and analyze the data within it, including joining your data with that of the provider.
Use Cases of Snowflake Data Clean Rooms
The potential use cases of Snowflake Data Clean Rooms are vast, covering several industries:
- In healthcare, pharmaceutical companies can jointly study drug effectiveness without sharing individual patient data.
- In the finance sector, banks can share transaction data to enhance fraud detection without exposing customer details.
- For retail and consumer goods, retailers and manufacturers can analyze sales and inventory data to optimize supply chains without compromising customer privacy.
Availability Regions:
As of July 2024, Snowflake Data Clean Rooms are available in select regions on Amazon Web Services (AWS), Microsoft Azure, and Google Cloud Platform (GCP).
Here's a table of all the available regions:
| Cloud Platform | Supported Regions |
| Amazon Web Services (AWS) |
US West (Oregon) US East (Ohio) US East (N. Virginia) Canada (Central) South America (Sao Paulo) EU (Ireland) Europe (London) EU (Paris) EU (Frankfurt) EU (Stockholm) Asia Pacific (Mumbai) Asia Pacific (Singapore) Asia Pacific (Sydney) Asia Pacific (Tokyo) Asia Pacific (Osaka) Asia Pacific (Seoul) Asia Pacific (Jakarta) |
| Microsoft Azure |
West US 2 (Washington) Central US (Iowa) South Central US (Texas) East US 2 (Virginia) Canada Central (Toronto) UK South (London) North Europe (Ireland) West Europe (Netherlands) Switzerland North (Zurich) UAE North (Dubai) Central India (Pune) Southeast Asia (Singapore) Japan East (Tokyo) Australia East (New South Wales) |
| Google Cloud Platform (GCP) |
US Central1 (Iowa) US East4 (N. Virginia) Europe West2 (London) Europe West4 (Netherlands) |
Features and Advantages of Snowflake Data Clean Rooms
Snowflake Data Clean Rooms offer a range of features and advantages that make them a powerful tool for secure data collaboration. Let’s dig in:
1) Secure Collaboration
The main feature of Snowflake Data Clean Rooms is collaboration on data analysis without exposing raw data. This is achieved through access controls, data masking and pre-built analysis templates. Collaborators can get insights from combined datasets without ever seeing the underlying raw data.
2) Privacy-Preserving Techniques
Snowflake Data Clean Rooms use various privacy-preserving techniques to keep sensitive information private:
- Aggregation Policies: Guarantees that the query results are always aggregated and never individual-level data.
- Minimum Threshold Requirements: Results are only returned if they meet a minimum number of records, so you can’t identify individuals in small groups.
- Differential Privacy: Adds statistical noise to results to protect individual privacy while maintaining accuracy.
3) Data Anonymization and Masking
Snowflake Data Clean Rooms have data anonymization and masking tools. Sensitive fields can be hashed before sharing, so you can join on those fields without exposing the original values.
4) Interoperability
Snowflake Data Clean Rooms work with data from multiple sources. Consumers can bring their own data into the Snowflake Data Clean Room and join it with the provider’s data, so you can do rich analysis while keeping data separate.
5) Governance and Compliance
Snowflake Data Clean Rooms have robust governance features:
- Fine-grained access controls so providers can specify what data and operations are allowed.
- Audit trails to track all data access and usage, for GDPR and CCPA compliance.
- Data lineage to track the flow of data and insights.
6) Flexibility and Scalability
Built on Snowflake’s cloud data platform, Snowflake Data Clean Rooms inherit its scalability and performance. They can handle large datasets and complex analysis without sacrificing speed or security.
7) Ease of Use
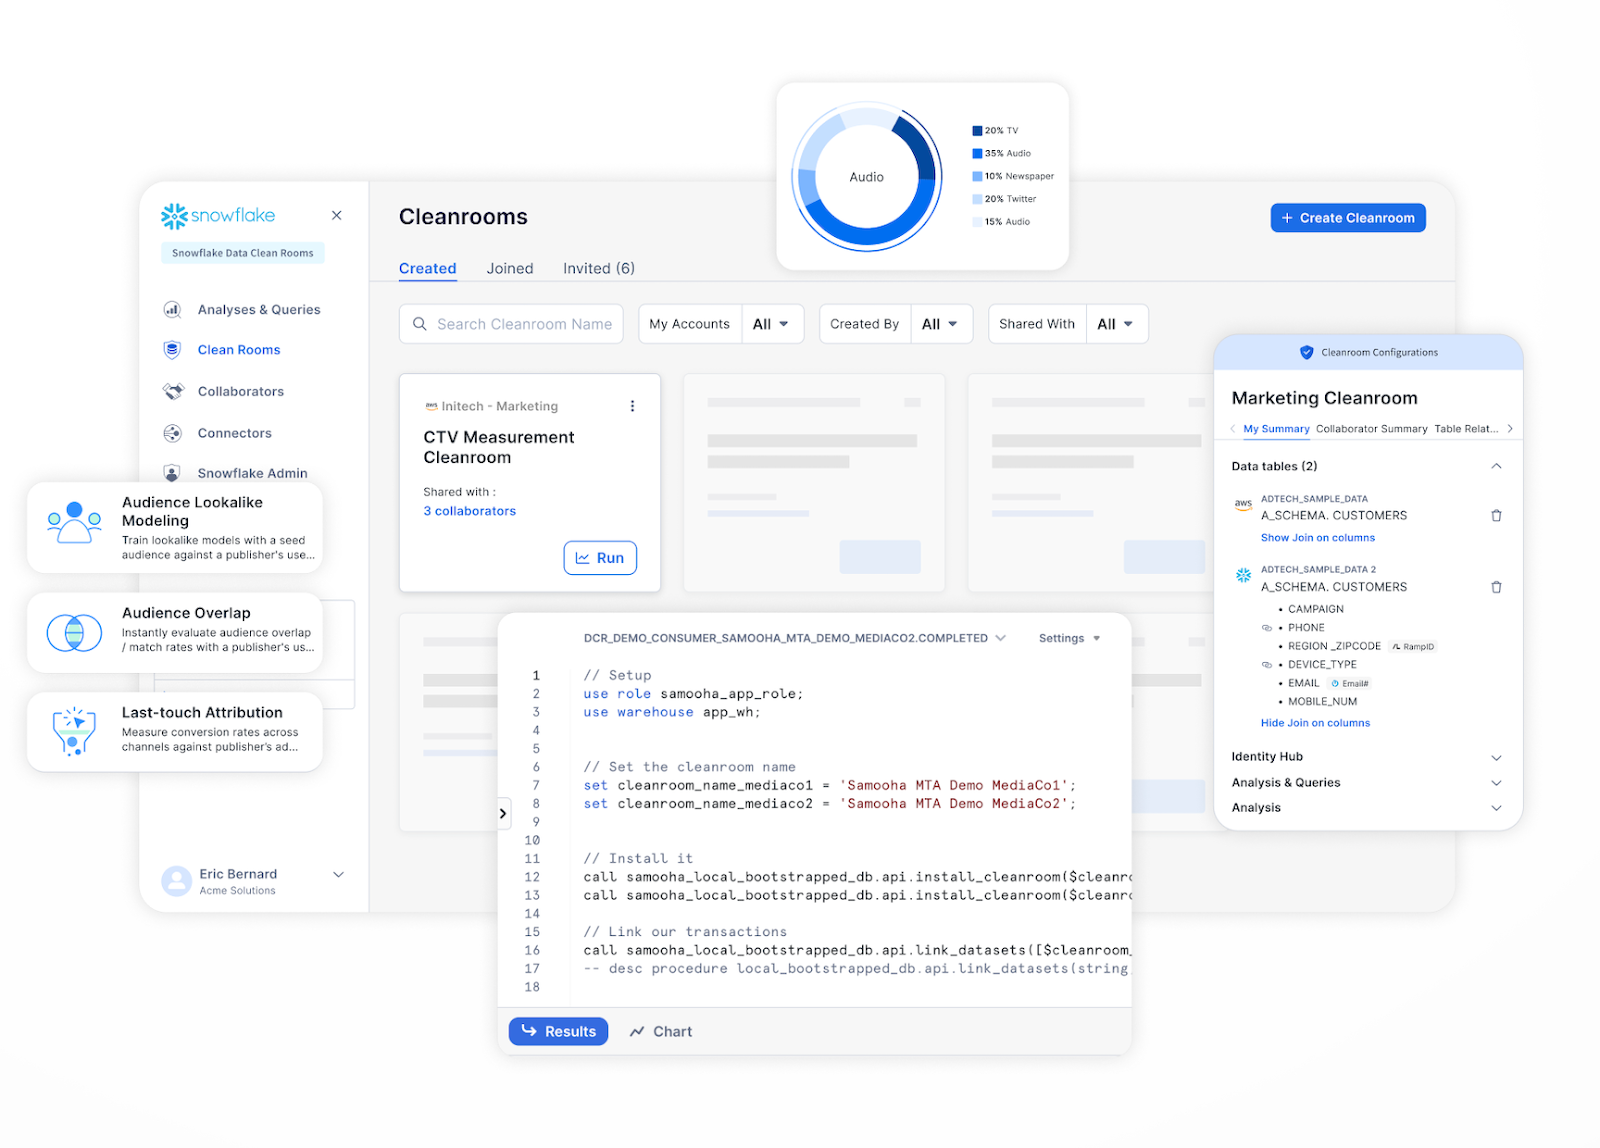
Snowflake provides both a web application and APIs for Clean Rooms. The web app offers pre-built templates for common analyses, while the API facilitates custom implementations.
8) Support for Multiple Analysis Types
Snowflake Data Clean Rooms support various types of analyses, including audience overlap, reach and frequency calculations, and attribution modeling. These can be customized to fit specific business needs.
Working with a Snowflake Data Clean Room
Snowflake Data Clean Rooms are designed for both business and technical users. There are two primary options for interaction:
1) Web App: This easy-to-use interface makes privacy-enhanced data collaboration accessible to a wide range of users, including non-technical business users. It offers pre-defined analysis templates.
2) Developer APIs: These provide a complete set of APIs for a technical audience to work with Snowflake Data Clean Rooms programmatically. This includes the ability to build custom applications and customize analysis templates and ML models.
In this article, we will focus on getting started with Snowflake Data Clean Rooms using the web app. Let’s jump right in!
Step-by-Step Guide to Getting Started with Snowflake Data Clean Rooms
Now that we have a decent understanding of what Snowflake Data Clean Room is, let's go through each step in detail on how to use it.
Prerequisite:
Before you dive into using Snowflake Data Clean Rooms, there are a few essential requirements you must meet:
1) Snowflake Account Requirements:
- You need a Snowflake account with an upfront capacity commitment, as on-demand accounts are not eligible for this feature.
- The provider account must be on the Enterprise Edition or higher, while the consumer account must have at least the Standard Edition.
- Both the provider and consumer must agree to additional Snowflake terms and policies.
2) Sign Up for Snowflake Data Clean Room Environment:
- Navigate to the specific sign-up page provided by Snowflake.
- Enter your Snowflake account identifier, email address, and company name.
- Verify your email and set up a password to complete the registration.
3) IP Address Allowlist Configuration:
If your Snowflake account uses a network policy to control traffic, you must explicitly allow traffic from the IP addresses used by the Snowflake Data Clean Room web app. These IP addresses vary depending on your region, see Add IP addresses to your allowed list.
4) Account Configuration:
- A user with the ACCOUNTADMIN role must set up the account.
- Create a service account specifically for the Clean Room.
5) Steps to Configure:
- Open the Snowflake Admin console in the Clean Room environment.
- Create a service account with unique credentials.
- Install the Snowflake Native App without renaming it.
- Register the required databases and schemas to make their objects available for collaboration.
Got all that? Great! Let's get started.
Step 1—Sign in to Snowflake Data Clean Room Web App
Let's walk through the process of creating, and using Snowflake Data Clean Rooms.
First, navigate to the Snowflake Data Clean Room sign-up page.
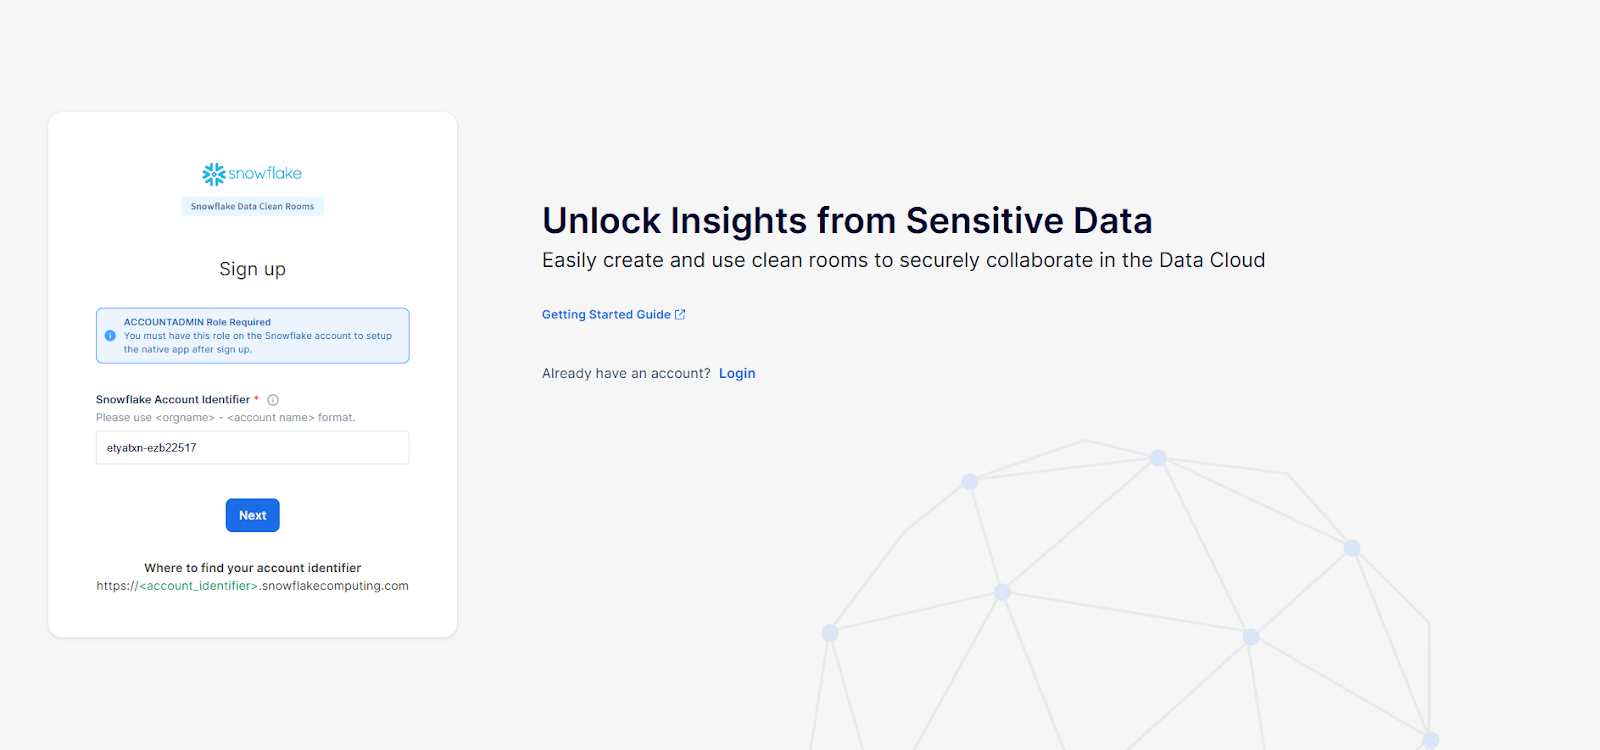
Next, sign up for a Snowflake Data Clean Room account using your company email address.
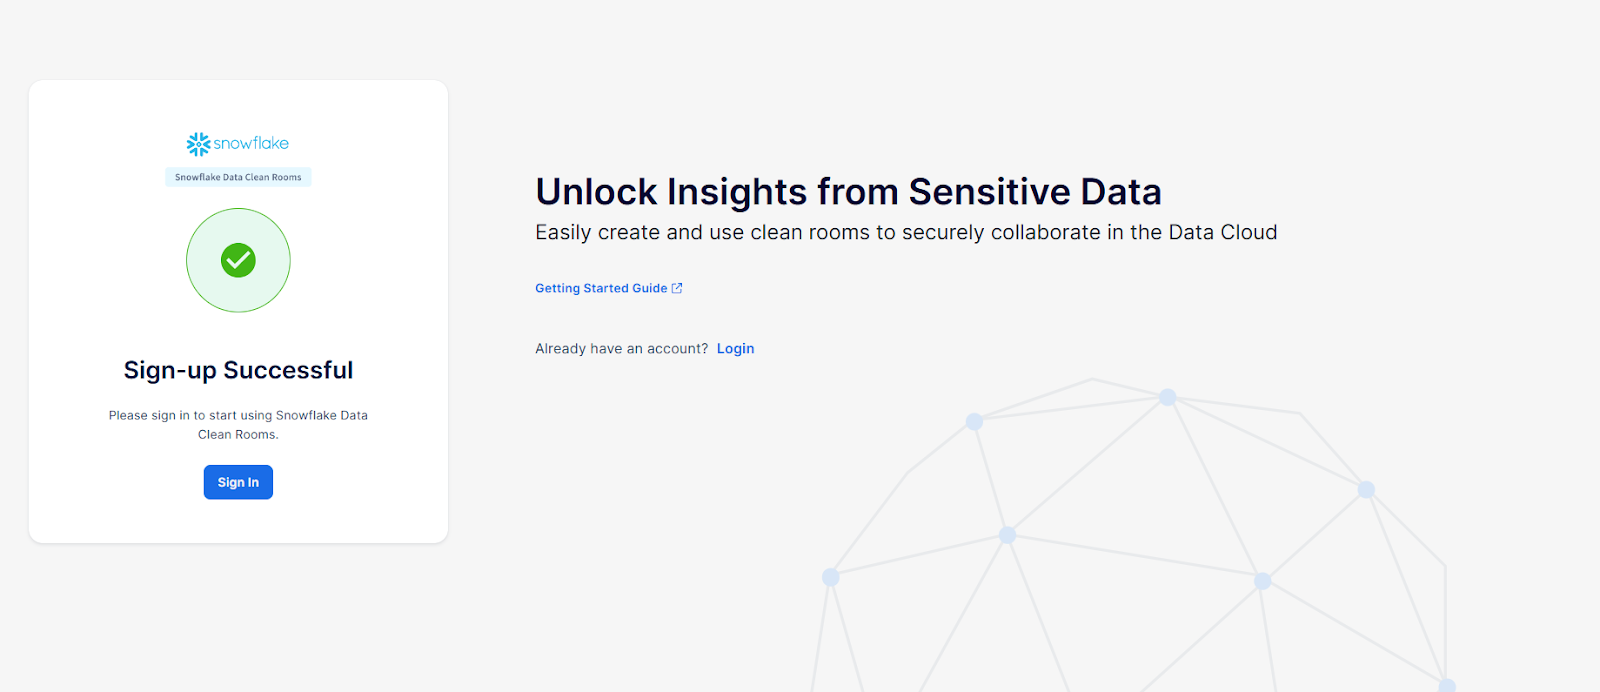
Once you have signed up, you can log in to your Snowflake Data Clean Room account. If you are associated with multiple Clean Room environments, select the Snowflake account you want to use as the provider account.
Now that you have successfully logged in to your Snowflake Data Clean Room, you can start creating Snowflake Data Clean Rooms.
Step 2—Creating a New Snowflake Data Clean Room (as Provider)
To create a Snowflake Data Clean Room as a provider, follow these detailed steps:
First—Starting the Creation Process:
1) Navigate to the "Clean Rooms" section from the left navigation panel.
2) On the Clean Rooms page, click on the "+ Clean Room" button.
3) Enter "Demo" (or name it according to your preference) as the name of your Clean Room. You will be allowing collaborators to run an audience overlap analysis in the Clean Room.
Second—Adding Data to Your Snowflake Data Clean Room
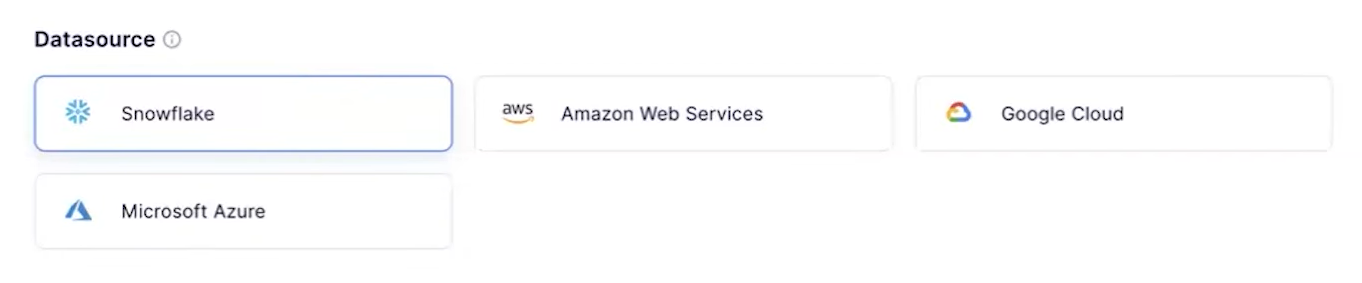
1) In the "Datasource" section, choose "Snowflake" from the options.
2) From the "Tables" drop-down list, select the AUDIENCE_OVERLAP.CUSTOMERS table (or choose according to your preference) located under the SAMOOHA_PROVIDER_SAMPLE_DATABASE database.
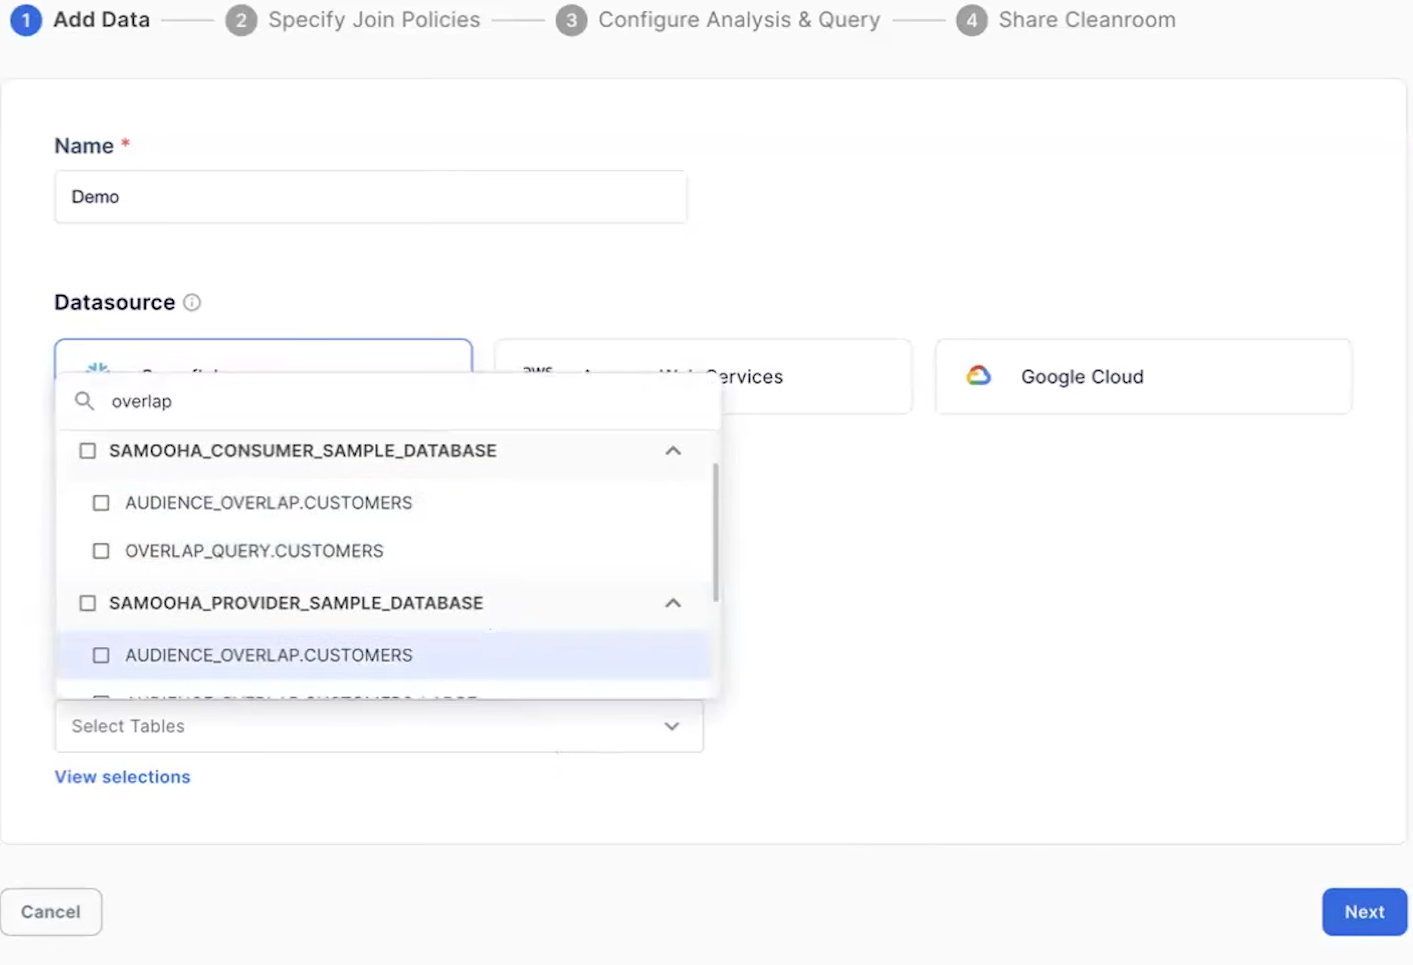
3) Click "Next" to move forward in the setup process.
Third—Specifying a Join Policy:
A join policy dictates which columns collaborators can use to join their data. From the "Join Columns" drop-down list, select the following columns:
- HASHED_EMAIL
- HASHED_FIRST_NAME
- HASHED_LAST_NAME
- (and any other columns according to your preference)
Always make sure that collaborators can only join their data using these specified columns.
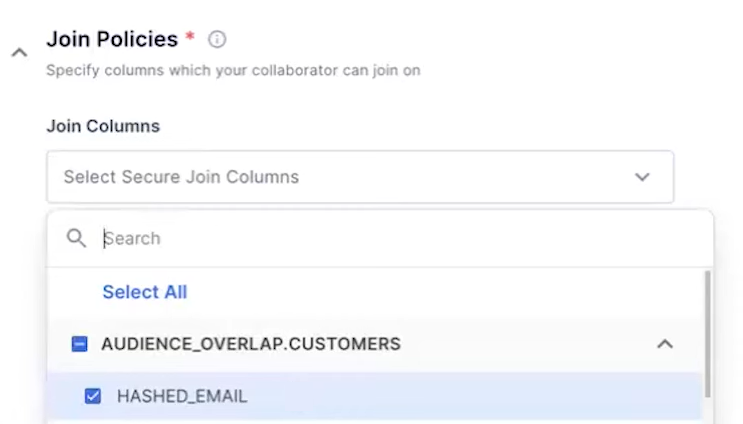
Click "Next" to proceed.
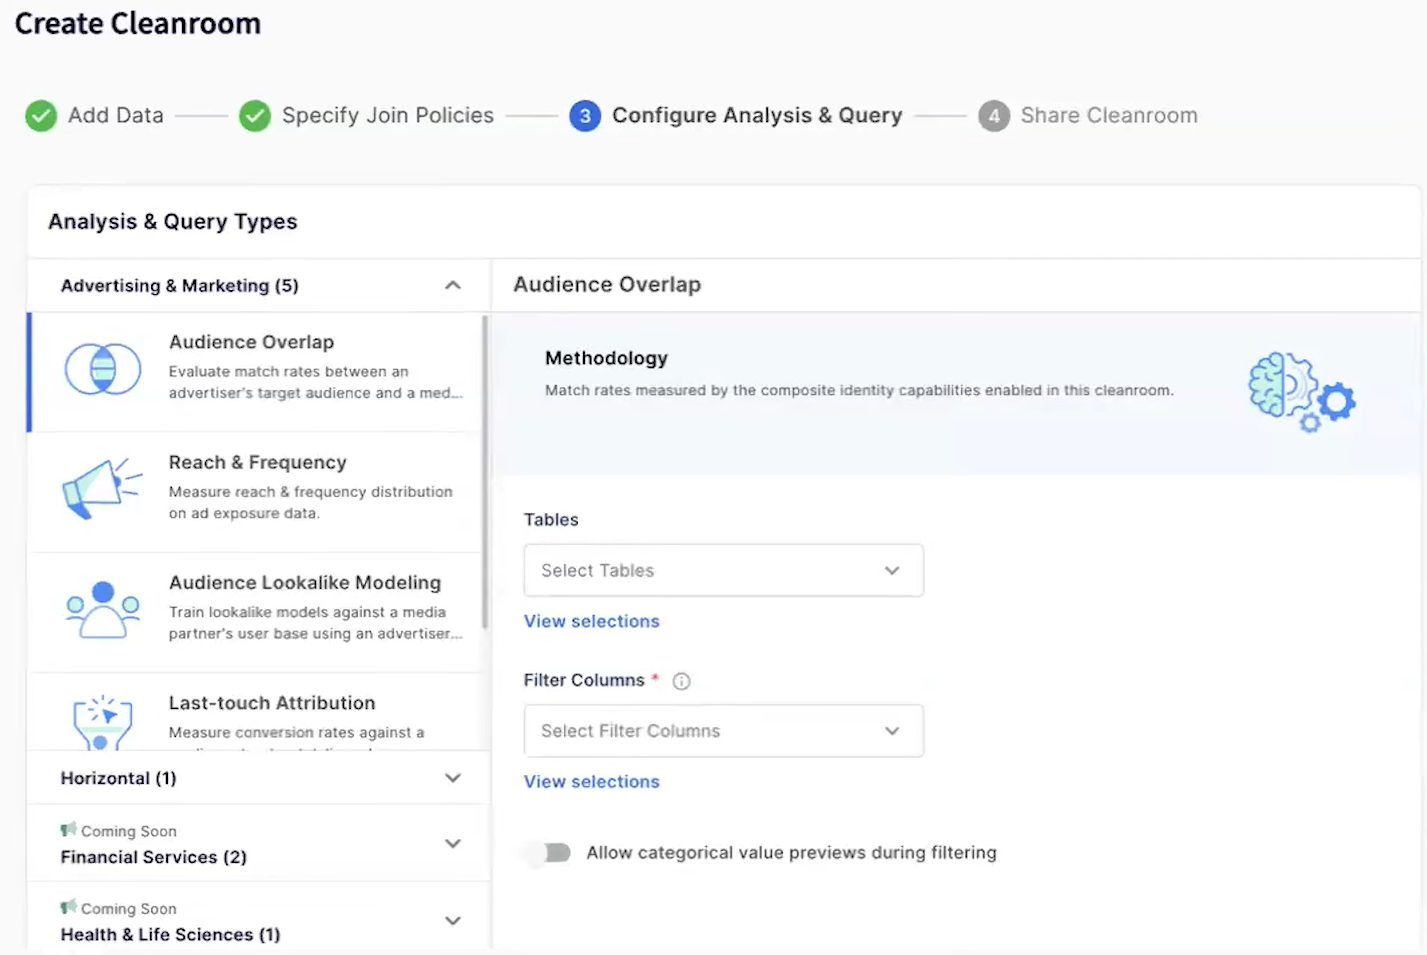
Fourth—Configuring an Analysis Template
1) Choose the "Audience Overlap & Segmentation" template, which limits collaborators to running audience overlap and segmentation analyses.
2) From the "Tables" drop-down list, select AUDIENCE_OVERLAP.CUSTOMERS, ensuring that collaborators can analyze data solely from this table.
3) From the "Filter Columns" drop-down list, select the columns you prefer.
4) Toggle on "Allow categorical value previews during filtering" to enable this feature for collaborators.
5) Click "Next" to finalize the template configuration.
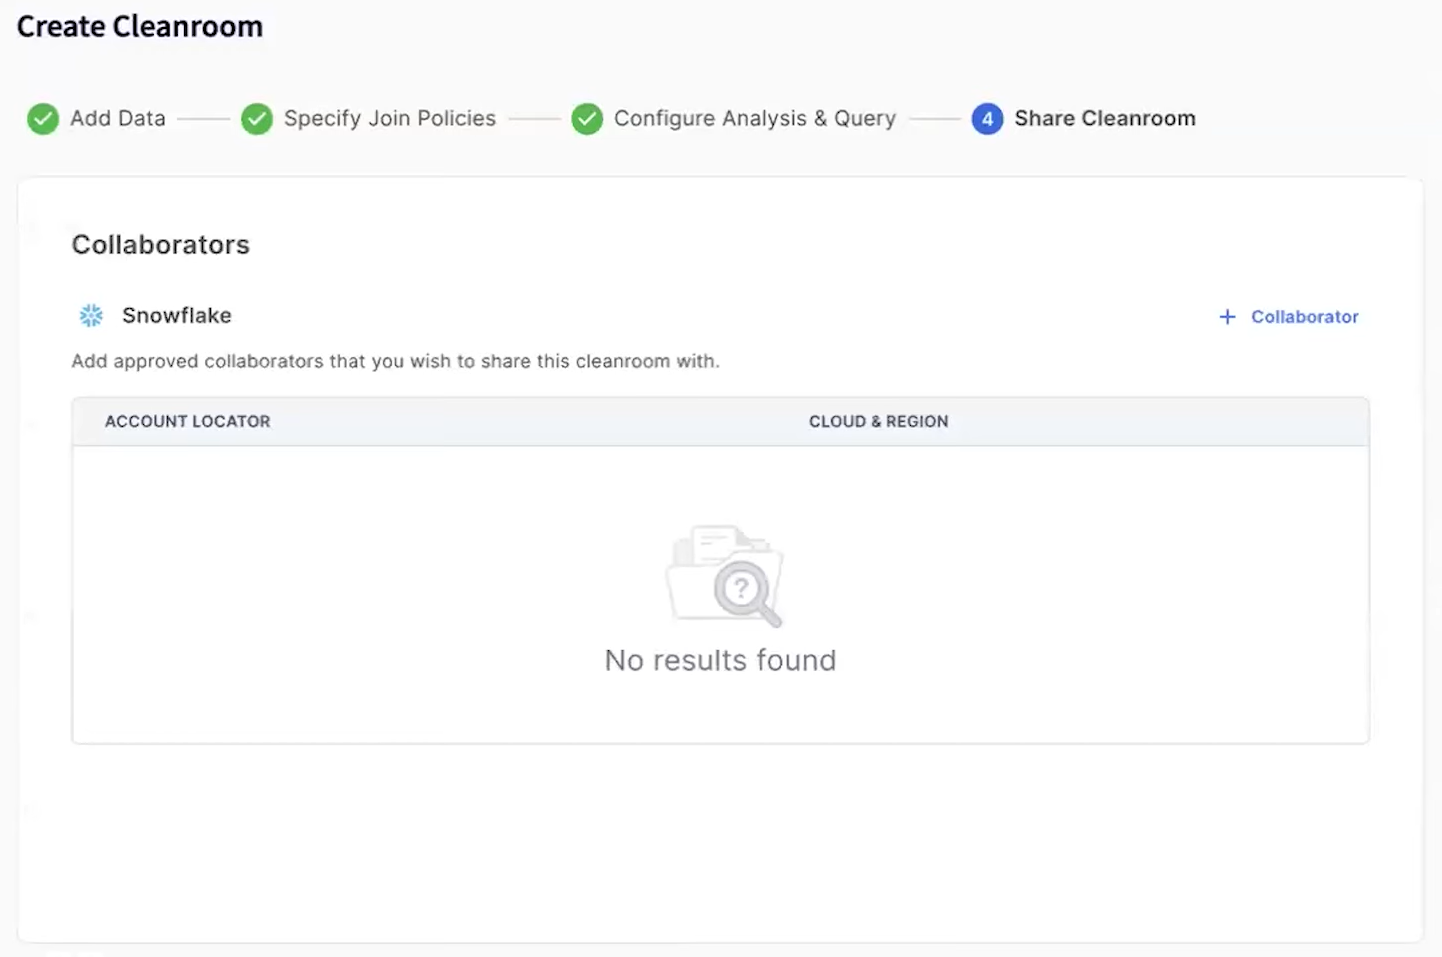
Step 3—Sharing the Snowflake Data Clean Room
Before sharing the Snowflake Data Clean Room, you need to add the consumer as a collaborator. This process ensures that the designated consumer has the necessary access to interact with the Snowflake Data Clean Room.
First—Adding the Consumer as a Collaborator
1) From the left navigation pane, select "Collaborators".
2) Click on the "Snowflake Partners" tab.
3) Select the "+ Snowflake Partner" button to initiate the addition process.
4) Enter Consumer Details:
- In the "Company Name" field, enter "Demo Consumer" or name it according to your preference.
- In the "Email Address" field, input the email associated with your Clean Room user.
- In the "Account Locator" field, provide the account locator of the Snowflake account you are using to simulate the consumer experience.
5) Select the appropriate cloud provider and region for the consumer account.
6) Click "Add" to finalize the consumer's addition as a collaborator.
Second—Sharing the Clean Room
1) After configuring the Clean Room, use the "+ Collaborator" to choose "Demo Consumer".
2) Click "Finish" to share the Clean Room with the selected consumer.
3) Wait until the Clean Room creation process is complete. Periodically refresh the page until the status of the Tutorial tile changes from "Processing" to "Edit".
Step 4—Installing & Configuring Snowflake Data Clean Room (as Consumer)
First—Installing the Clean Room
To start using the Snowflake Data Clean Room shared with you, start by installing it within your consumer account.
1) Navigate to the "Clean Rooms" section from the left navigation pane.
2) Click on the "Invited" tab to view Clean Rooms shared with you.
3) Locate the "Tutorial" tile and select "Join" to start the installation process.
Second—Adding Consumer Data
1) In the "Datasource" section, choose "Snowflake".
2) Now, from the "Tables" drop-down list, select the AUDIENCE_OVERLAP.CUSTOMERS table, located under the SAMOOHA_SAMPLE_DATABASE database.
3) Click "Next" to continue.
Third—Defining a Join Policy
A join policy establishes the relationship between the consumer’s data and the provider’s data, specifying which columns to join during analyses or queries.
1) Make sure that the columns from your table align with the columns from the provider's table.
For instance, join your HASHED_EMAIL column with the provider’s HASHED_EMAIL column. These join columns were predefined when the provider created the Clean Room, limiting the join to specified columns only.
2) Click "Next" to proceed.
Fourth—Defining Segmentation and Activation Columns
Setting segmentation and activation columns determines which columns analysts can use to create segments, filter results, and enrich activation data during their analyses.
1) Firstly, from the "Tables" drop-down list, choose the AUDIENCE_OVERLAP.CUSTOMERS table.
2) Then, from the "Segmentation & Activation Columns" drop-down list, select the columns you prefer.
3) Finally, click "Finish" to complete the installation process.
Wait until the Clean Room installation process is complete. Periodically refresh the page until the status of the Tutorial tile changes from "Processing" to "Run".
Step 5—Running an Analysis
To run an analysis within the Snowflake Data Clean Room, follow these steps:
1) Navigate to "Clean Rooms" in the left pane, select the "Joined" tab, find the "Tutorial" tile, and click "Run".
2) Select "Audience Overlap & Segmentation" and click "Proceed".
2) Choose "Customers" for both "My Tables" and "Collaborator Table".
3) Select HASHED_EMAIL from the drop-down list.
4) Click "+ Join Column" to add the column you prefer.
5) Now, let's set up the segmentation criteria. For that, you can select your preferred list. For instance, from "My Columns", select INCOME_BRACKET, and from "Collaborator Columns", select AGE_BAND.
6) In the Filters section, use the drop-down lists to define AUDIENCE_OVERLAP.CUSTOMERS.STATUS as GOLD. Make sure you use the color coding to select the column in the consumer account.
For a record in the consumer table to be included in the analysis results, its STATUS must be GOLD.
7) Click "Run" to execute the analysis. View results in the "Results" section. You can toggle your results metric between match rate and overlap count.
Step 6—Activating the Results of Analysis
To activate your analysis results and enrich the provider's Snowflake account:
1) In the "Results" section, select "Activate".
2) Select the provider account (one that you used to share the Clean Room).
3) Enter "Provider Snowflake Account" in the "Segment Name" field.
4) From "Attribute Columns", choose "Select All" to include all additional data.
5) Click "Push Data" to send the enriched results back to the provider’s Snowflake account.
You have now successfully activated the analysis results, enriching the provider's data for further use.
Step 7—Viewing the Activation Data (as Provider)
To view the consumer's activation data as the provider, follow these steps to access and analyze the data in your Snowflake account.
1) Navigate to the sign-in page, enter your email address, and select "Continue". Enter your password.
Note: If this is your first time pushing activation data, it may take up to 24 hours for the data to appear in the provider’s Snowflake account.
2) Sign in to Snowsight for the provider account. Make sure you are signing into the Snowflake account, not the Snowflake Data Clean Room environment.
3) In the left navigation, select Data > Database.
4) Go to SAMOOHA_BY_SNOWFLAKE_LOCAL_DB > PUBLIC > Tables > PROVIDER_ACTIVATION_SUMMARY.
5) Select "Data Preview" to view the activation data.
Step 8—Deleting Activation Data
To delete the activation data from the provider's Snowflake account, follow these precise steps:
1) Log in to Snowsight for the provider account.
2) Navigate to Projects > Worksheets.
3) Select + > SQL Worksheet to create a new SQL worksheet.
4) In the new worksheet, paste the following SQL statement:
DELETE FROM samooha_by_snowflake_local_db.public.provider_activation_summary
WHERE segment = 'Provider Snowflake Account';
Run the statement to delete the activation data created for this tutorial.
Step 9—Deleting Snowflake Data Clean Room
To delete a Snowflake Data Clean Room and remove it from both the provider and consumer accounts, follow these steps:
1) Navigate to the sign-in page, enter your email address, and select 'Continue'. Enter your password.
2) Choose the Snowflake account that you used as the provider account.
3) In the left navigation, select "Clean Rooms".
4) On the "Created" tab, locate the "Tutorial" tile.
5) Click the "More" icon (three vertical dots) next to the tile.
6) Select "Delete" and then "Proceed" to confirm.
Limitations of Snowflake Data Clean Rooms
Snowflake Data Warehouses have a great framework for multi-party data sharing. But there’s some caveats to be aware of.
1) Cross-Cloud Compatibility Issues
Snowflake Data Clean Rooms support multiple clouds (AWS, GCP, Azure), but both accounts must be in the same cloud and region for data sharing. This means you need to replicate data to the desired cloud regions which adds complexity and management overhead.
2) Complex Setup for Non-Snowflake Users
Everyone using the Snowflake Data Clean Room needs a Snowflake account. Non Snowflake users need to sign up or have a Reader Account created for them. This is a barrier for companies that aren’t already Snowflake customers.
3) Dependency on Snowflake's Features
The effectiveness of Snowflake Data Clean Rooms heavily relies on Snowflake's built-in features such as Row Access Policies, Secure Data Sharing, and Stored Procedures. While this is convenient it also means any changes or limitations to these features will impact Data Clean Rooms.
4) Data Aggregation Limitations
Data has to be aggregated to hide sensitive data. But aggregation can limit the detail of the data and therefore the insights.
5) Operational Overhead
Snowflake Data Clean Rooms can add operational overhead when dealing with multiple data sources and frequent updates.
Further Reading
- Introduction to Snowflake Data Clean Rooms
- Snowflake Data Clean Rooms: Securely Collaborate to Unlock Insights and Value
- What Is a Data Clean Room, and Do You Need One?
- Getting started with Snowflake Data Clean Rooms
- Tutorial: Get started with the web app of a Snowflake Data Clean Room
Save up to 30% on your Snowflake spend in a few minutes!


Conclusion
And that’s a wrap! As data is the foundation of informed business decisions, secure data sharing is more important than ever. Traditional methods fall short, leaving gaps in security and privacy. Snowflake Data Clean Rooms is the modern solution that lets you analyze and collaborate on sensitive data without exposing the underlying data. This is compliant with the toughest data privacy regulations and enables secure data sharing across industries. Use Snowflake Data Clean Rooms to get new insights, optimize and grow while keeping data private and secure.
In this article, we have covered:
- What Is Snowflake Data Clean Rooms?
- Features and Advantages of Snowflake Data Clean Rooms
- Step-by-Step Guide to Getting Started with Snowflake Data Clean Rooms
- Limitations of Snowflake Data Clean Rooms
... and so much more!
FAQs
What is a Snowflake Data Clean Room?
Snowflake Data Clean Room is a secure environment where multiple parties can collaborate on data analysis without exposing the underlying raw data.
On which cloud platforms are Snowflake Data Clean Rooms available?
They are available on AWS, Azure, and GCP in select regions.
What are the account requirements for using Snowflake Data Clean Rooms?
Provider accounts need Enterprise Edition or higher, while consumer accounts need at least Standard Edition. On-demand accounts are not eligible.
What are the main limitations of Snowflake Data Clean Rooms?
Key limitations include cross-cloud compatibility issues, complex setup for non-Snowflake users, and dependency on Snowflake's features.
How can users interact with Snowflake Data Clean Rooms?
Users can interact via a web app with pre-defined analysis templates or through developer APIs for custom applications.
What industries benefit most from Snowflake Data Clean Rooms?
Industries like advertising, media, financial services, healthcare, and retail benefit greatly by using Snowflake Data Clean Rooms to securely collaborate on data analysis and gain valuable insights.