


If you've been working with databases, you've probably heard of Views. Think of a View as a virtual table. It doesn't store data itself, but instead, it's a saved SQL query that you can use like a table. Snowflake Views take this concept and enhance it. They're not just simple saved queries; they're powerful tools that can transform how you interact with your data. In Snowflake, Views have many purposes. They include combining, segregating, and protecting data. Snowflake offers three main types of Views. They are: Standard Views (Non-Materialized), Materialized Views, and Secure Views.
In this article, we'll cover what Snowflake Views are and what they can do, the different types of Views, how to create Views (with plenty of examples), and the advantages and limitations of using Snowflake Views.
What Are Snowflake Views?
Snowflake Views are virtual tables derived from the result set of a SQL query. Unlike physical tables, Views do not store data themselves; instead, they dynamically generate results based on the underlying data in the base tables each time they are queried. You can create Views in Snowflake using the Snowflake CREATE VIEW statement. Views are extremely useful as they simplify complex queries, encapsulate business logic, and provide a level of abstraction over the base tables.
What Can Snowflake Views Do?
1) Simplified Data Access: Snowflake Views allow you to simplify complex queries and make data more accessible to users. You can create a View that combines data from multiple tables or applies filters and aggregations and then treats it like a table in your queries.
3) Restrict access to specific data: Snowflake Views provide a layer of abstraction between users and the underlying data structure. You can change the underlying tables without affecting how users interact with the View as long as the columns and data types presented by the View remain the same.
2) It's Virtual: Snowflake Views don’t store data themselves. They fetch and present data based on the underlying query when referenced.
4) Better Data security: You can use Snowflake Views to hide data. Create a View that only shows specific columns or rows of a table so users can’t see what they shouldn’t.
5) Improve Query Performance: Snowflake Materialized Views can significantly speed up query performance for certain types of queries.
Syntax and Basic Usage of Snowflake CREATE VIEW
Now that we know what Snowflake Views are and their types, let's look at how to create them. The basic syntax for creating a View in Snowflake is straightforward:
Basic Syntax:
CREATE [OR REPLACE] [SECURE] VIEW [IF NOT EXISTS] <View_name>
    [(<column_name> [, <column_name> ...)]
AS <select_statement>;
Parameters:
Let's break down the key parameters:
- OR REPLACE: This option allows you to update an existing View. If you omit it and the View already exists, you'll get an error.
- SECURE: Use this to create a Snowflake Secure View.
- IF NOT EXISTS: This prevents an error if you try to create a View that already exists.
- <View_name>: The name you want to give your View.
- <column_name>: Optional. You can specify column names if you want them to be different from the result set.
- <select_statement>: This is the query that defines your View.
For a full syntax overview of Snowflake Views, see the Snowflake CREATE VIEW documentation.
Save up to 30% on your Snowflake spend in a few minutes!


How To Create Views In Snowflake?
Basic Snowflake View Example:
Let's say you have a table named "employees" in your Snowflake database with the following columns:
- employee_id
- first_name
- last_name
- department
- salary
Now, you want to create a Snowflake View that shows only the employees from the "IT" department along with their full name and salary. Here's how you would do it:
CREATE VIEW it_employees AS
SELECT employee_id, CONCAT(first_name, ' ', last_name) AS full_name, salary
FROM employees
WHERE department = 'IT';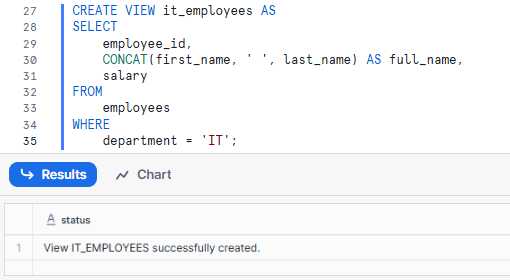
As you can see in this example, the Snowflake CREATE VIEW it_employees statement creates a View named it_employees. The AS keyword starts the SQL query. SELECT employee_id, CONCAT(first_name, ' ', last_name) AS full_name, salary retrieves the employee ID, full name, and salary. FROM employees specifies the source table, and WHERE department = 'IT' filters for IT employees.
For a more in-depth detailed tutorial, you can check out this youtube video:
What Are the Types of Views in Snowflake?
Snowflake offers three types of Views, each with its own strengths and use cases: Non-Materialized Views (referred to as "Views"), Materialized Views, and Secure Views. Let's break them down:
1) Non-Materialized
These are your classic database Views. They're stored queries that don't hold any data themselves. Each time you query a standard View, Snowflake runs the underlying query from scratch.
Non-materialized Views are commonly referred to as simply "Views" in Snowflake.
2) Snowflake Materialized Views
Here's where Snowflake starts to show off. Snowflake Materialized View is a pre-computed View of data stored in a table-like structure. It’s used to improve query performance and reduce resource usage by pre-computing the results of complex queries and storing them as cached result sets. When subsequent queries are run against the same data Snowflake can just access the Snowflake Materialized View directly rather than re-computing the query every time.
For more in-depth on Snowflake Materialized Views, see What are Snowflake Materialized Views?.
3) Snowflake Secure Views
Snowflake Secure Views are like standard Views with a security boost. It gives you extra data privacy and security. These Views hide the underlying data in the base tables from unauthorized users and hide the View definition from everyone except authorized users.
For more in-depth on Snowflake Secure Views, see What are Snowflake Secure Views?.
Remember this, each type of Snowflake View has its place, and knowing when to use each one is key to mastering Snowflake Views.
Practical Examples of Creating Views Using Snowflake CREATE VIEW
Let's get our hands dirty with some practical examples. First, we create two tables: students and course_enrollment.
The students table contains basic information about students. The course_enrollment table tracks which courses each student is enrolled in.
We then insert some sample data into these tables.
CREATE OR REPLACE TABLE students (
    student_id INT,
    name STRING,
    major STRING,
    gpa FLOAT,
    enrollment_date DATE
);
INSERT INTO students VALUES
(1, 'Elon', 'Computer Science', 3.8, '2021-09-01'),
(2, 'Jeff', 'Physics', 3.6, '2021-09-01'),
(3, 'Mark', 'Mathematics', 3.9, '2022-01-15'),
(4, 'Bill', 'Computer Science', 3.7, '2022-01-15'),
(5, 'Warren', 'Physics', 3.5, '2021-09-01');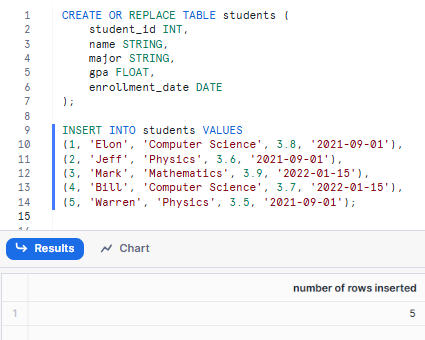
CREATE OR REPLACE TABLE course_enrollment (
    student_id INT,
    course_id STRING,
    enrollment_date DATE
);

INSERT INTO course_enrollment VALUES
(1, 'CS50', '2021-09-01'),
(1, 'MATH201', '2021-09-01'),
(2, 'PHY301', '2021-09-01'),
(3, 'MATH301', '2022-01-15'),
(4, 'CS201', '2022-01-15'),
(5, 'PHY201', '2021-09-01');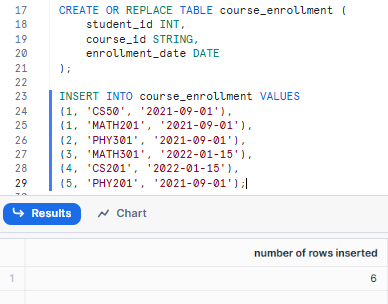
Now, let's create some Snowflake Views!
Example 1—Creating a Simple View using Snowflake CREATE VIEW
Let's create a simple Snowflake View that displays a subset of columns from the students table.
CREATE OR REPLACE VIEW student_info_view AS
SELECT student_id, name, major, gpa
FROM students;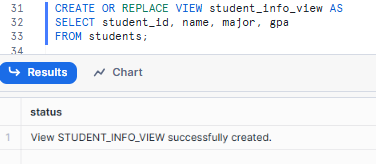
What we've done here is essentially create a saved SELECT statement that pulls specific columns from the students table.
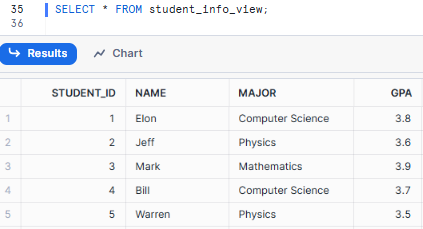
Notice that we didn't include the enrollment_date column—this View is a way to present a subset of the data.
Why would we do this? Because you’re running queries that need this exact same student data all the time. Instead of typing out the SELECT statement every time, just query this Snowflake View.
Example 2—Creating a Snowflake View to Restrict Access
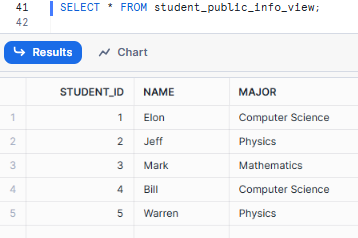
Now, let's tackle something a bit more interesting—creating a Snowflake Secure View that only includes non-sensitive student information.
CREATE OR REPLACE SECURE VIEW student_public_info_view AS
SELECT student_id, name, major
FROM students;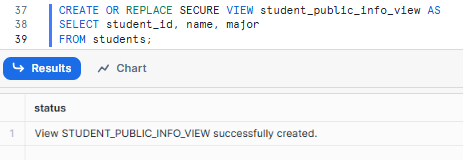
As you can see, we omitted the GPA, which might be considered private information. This View could be super useful if you need to provide general student information to a broader audience—think of a student directory that anyone can access. It gives you the ability to share some data while keeping sensitive information (like GPAs) under wraps.
The SECURE keyword is crucial here. It adds an extra layer of protection, ensuring that users can't reverse-engineer the View to figure out its underlying query.
Example 3—Creating a Snowflake View to List Students Enrolled in a Specific Course
Let's kick it up a notch. This time, we'll create a View in Snowflake that combines data from two tables to show all students enrolled in a specific course.
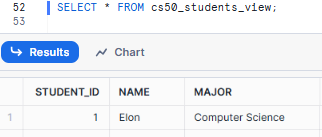
CREATE OR REPLACE VIEW cs50_students_view AS
SELECT s.student_id, s.name, s.major
FROM students s
JOIN course_enrollment ce ON s.student_id = ce.student_id
WHERE ce.course_id = 'CS50';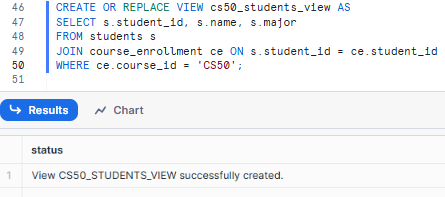
This Snowflake View does all the heavy lifting for us. It joins the students and course_enrollment tables and filters to show only students in CS50. You’re a professor or admin who needs to pull up a list of students in CS50 all the time. This View does that for you in one query!
Example 4—Creating a Snowflake View to Calculate Average GPA by Major
Now we're getting into the real power of Views.
CREATE OR REPLACE VIEW avg_gpa_by_major_view AS
SELECT major, AVG(gpa) as avg_gpa
FROM students
GROUP BY major;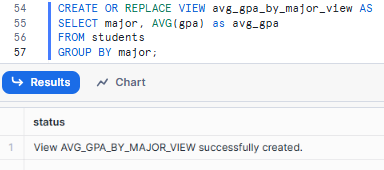
This View is not just presenting data—it’s doing the math on the fly. Every time you query this View, it calculates the average GPA for each major. Handy for advisors or department chairs who want to see how majors are doing in a snap.
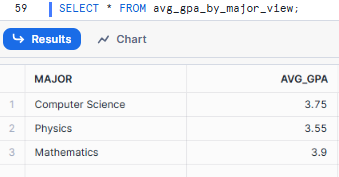
Remember, the View doesn't store this data—it calculates it each time you query the View. So you're always getting up-to-date information!
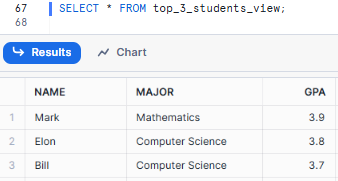
Example 5—Creating a Snowflake View to Display Top 3 Students by GPA
Last but not least, let's create a View that showcases the cream of the crop:
CREATE OR REPLACE VIEW top_3_students_View AS
SELECT name, major, gpa
FROM students
ORDER BY gpa DESC
LIMIT 3;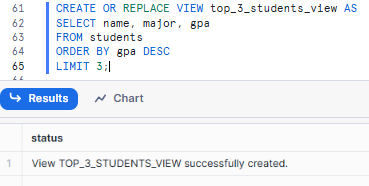
This View orders all students by GPA (highest first) and then shows only the top 3. It's a great example of how Views can include sorting and limiting of results. This could be used to quickly identify high-performing students, perhaps for academic awards or scholarships.
Each of these shows a different superpower of Snowflake Views. They can simplify your queries, add security, combine data from multiple sources, do math, and present data in a useful way. By generating these Snowflake Views, you’re basically saving these queries so you can reuse them, making your data more accessible and easier to work with. Nice huh?
Advantages of Using Snowflake Views
Now that we've seen Snowflake Views in action, let's talk about why you'd want to use them. Let's dive into some of the benefits of Snowflake Views:
1) Simplified Query Management
Snowflake Views can encapsulate complex logic, making your queries cleaner and easier to manage. Instead of writing a 50 or 100-line query every time, you can just query your View.
2) Code Modularity and Reusability
Once you create a Snowflake View, you can use it in multiple places. This promotes code reuse and makes your life easier. Why reinvent the wheel when you can just call your View?
3) Data Security and Access Control
Snowflake Secure Views allow you to implement row- and column-level security without modifying the underlying data model.
4) Performance Optimization
Snowflake Materialized Views can significantly speed up query performance for certain types of queries, especially for complex aggregations. It's like having a cache for your most complex calculations.
5) Improved Data Presentation
Snowflake Views allow you to reshape your data into formats that make sense for specific use cases or users.
6) Logical Data Abstraction
Snowflake Views create a logical layer on top of your physical data model. This makes it easier to manage changes over time and can simplify your data architecture.
7) Version Control and Change Management
Snowflake Views make it easier to manage changes to your data model. If you need to change how data is displayed you can just update the View without having to change the underlying queries.
What Are the Limitations of Views in Snowflake?
Snowflake Views are great, but they are not a perfect solution. Here are a few limitations to remember:
Limitations of Standard (Non-materialized) Snowflake Views
1) Read-Only
Snowflake Views are inherently read-only. You cannot directly modify data in a View using DML commands (INSERT, UPDATE, DELETE). Any modifications need to be done on the underlying base table(s).
2) Not Automatically Updated
Changes made to the base table(s) a View is built on are not automatically reflected in the View's results. You'll need to re-query the View to see the updated data.
3) Cannot use ALTER VIEW to change the definition of a View
You cannot modify the definition of an existing View using an ALTER VIEW command. To change a View, you must recreate it with a new definition.
Limitations of Snowflake Materialized Views
1) Single Table Query
Snowflake Materialized Views can only query data from a single base table. Joins and subqueries are not supported.
2) Limited Functionality
Snowflake Materialized Views cannot utilize certain features like window functions, user-defined functions (UDFs), HAVING clauses, ORDER BY clauses, LIMIT clauses, or complex GROUP BY expressions.
For more in-depth on the limitations of Snowflake Materialized Views, See What are the benefits & limitations of Using a Snowflake Materialized View?.
Managing Existing Snowflake Views
Once views are created, there are several commands available to manage their lifecycle, properties, and metadata within Snowflake.
Dropping a View
To remove a View that is no longer needed, use the DROP VIEW command. This permanently deletes the View from the database or schema.
DROP VIEW [IF EXISTS] <View_name>;The IF EXISTS clause is highly recommended as it prevents an error if the View does not exist, allowing the command to complete successfully without raising an exception. Note that dropped views cannot be recovered and must be recreated if needed again.
Altering a View
The ALTER VIEW command allows you to modify certain properties of an existing View, but it cannot change the View's underlying SELECT statement (definition). To change the definition, you must use CREATE OR REPLACE VIEW.
Supported ALTER VIEW operations include:
Adding, Overwriting, or Removing a Comment:
ALTER VIEW <View_name> SET COMMENT = 'New comment for the view.';
ALTER VIEW <View_name> UNSET COMMENT;
Converting to or from a Secure View:
ALTER VIEW <View_name> SET SECURE;      -- Converts to a Secure View
ALTER VIEW <View_name> UNSET SECURE;    -- Converts back to a regular View
Renaming a View:
ALTER VIEW <View_name> RENAME TO <new_View_name>;Listing and Describing Views
To help manage your Views, Snowflake provides commands to inspect their existence and structure:
SHOW VIEWS;Lists all Views within the current database and schema, or a specified schema.
DESCRIBE VIEW <View_name>;Provides the column definitions (name, data type, nullability) for a specific View.
Want to Learn More?
For those who want to learn more, here are some great resources on the functions and features of Snowflake Views:
- Overview of Views
- Snowflake CREATE VIEW
- Working with Snowflake Materialized Views
- Snowflake Views Vs. Materialized Views: What's the Difference?
Want to take Chaos Genius for a spin?
It takes less than 5 minutes.

Conclusion
And that’s it! Snowflake Views are super powerful. They simplify your queries, keep your data safe, speed up performance, and make your data a breeze to work with. Whether you're using standard Views to simplify crazy queries, Snowflake Materialized Views to speed up aggregations, or Snowflake Secure Views to control access, there's a Snowflake View that's got your back. Knowing the different types of Views and their good and bad points lets you get the most out of Snowflake Views in your data management.
FAQs
What is a view in Snowflake?
A view is a database object that allows you to store a query for later use. It provides a way to present data in a table-like structure without storing the actual data.
What is a Snowflake Materialized View?
Snowflake Materialized View stores the result of the query physically, providing faster query performance at the cost of additional storage and maintenance.
How do Snowflake Secure Views differ from regular Snowflake Views?
Snowflake Secure Views ensure that the View's definition and underlying data are not exposed to unauthorized users, enhancing data privacy.
How do I create a View in Snowflake?
Use the Snowflake CREATE VIEW statement followed by your query definition.
How do I create a Snowflake Secure View?
Use the Snowflake CREATE SECURE VIEW statement.
How can I list all Views in my database?
Use the SHOW VIEWS command to list all Views within a database or schema.
Can I use a View in a subquery?
Yes, Views can be used in subqueries just like tables.
What types of Views are available in Snowflake?
Snowflake supports non-materialized Views, Snowflake Materialized Views, and Snowflake Secure Views.
Is there a limit to how many Snowflake Views I can create?
There's no hard limit on the number of Views, but remember that each View consumes some resources, so it's best to create them carefully.
Can I use time travel with Snowflake Views?
Time travel works with Views, but it applies to the underlying tables. The View definition itself doesn't have time travel.
Can I create a Snowflake View across different databases?
Yes, you can create Views that reference objects in different databases, as long as you have the necessary permissions.


