


Apache Spark is an open source, distributed engine for large-scale data processing. It was developed at UC Berkeley's AMPLab in 2009 (and released publicly in 2010), mainly to address the limitations of Hadoop MapReduce—particularly for iterative algorithms and interactive data analysis. Spark executes programs significantly faster—up to 100x quicker than Hadoop MapReduce in certain workloads—primarily due to its in-memory processing capabilities. Plus, it can run on disk, making it a great choice for a variety of workloads. Spark has become a standard in big data processing due to its ability to handle both batch and real-time data, along with support for SQL, streaming, machine learning, and graph analytics. Moreover, Spark is relatively easy to use, with APIs for multiple programming languages like Scala, Java, Python (PySpark), and R—making it accessible to developers from diverse backgrounds.
In this article, we'll cover everything you need to know about using Apache Spark with Python—commonly referred to as PySpark—including the fundamentals, the installation process, and a hands-on example to demonstrate PySpark's capabilities.
Why Spark?
Before we dive into Spark with Python (PySpark), let's look at what makes Spark so special. Spark is a powerful tool for handling big data tasks that would be challenging for traditional systems because of the following features:
1) Unified Data Processing — Spark provides a single framework that can be used for a variety of data processing tasks, including batch processing, real-time stream processing, machine learning, and interactive analytics. Spark offers modules such as Spark Streaming, MLlib, and Spark SQL, which facilitate these capabilities.
2) In-Memory Computation — Spark utilizes in-memory computation to speed up tasks by caching data in memory, reducing disk I/O. It can also operate on disk when memory limits are exceeded.
3) Fault Tolerance — Spark ensures reliability by offering fault tolerance through the concept of Resilient Distributed Datasets (RDDs). RDDs can be recomputed in case of node failures, providing a layer of redundancy that guarantees the integrity of long-running jobs.
4) Lazy evaluation — Spark optimizes performance through lazy evaluation. Instead of processing data immediately, Spark builds a Directed Acyclic Graph (DAG) of the operations to be performed. It only processes data when an action requiring a result is triggered, which helps to avoid unnecessary computations.
5) Runs Everywhere — Spark is platform-agnostic, meaning it can run on various environments. It can run on clusters in the cloud (AWS, Google Cloud, Microsoft Azure), on-premises Hadoop clusters, and even in standalone mode on individual machines.
6) Multiple language support — While we're focusing on Python, Spark also supports other popular programming languages. Spark has APIs available for Scala, Java, and R, allowing developers to work with the language they're most comfortable with.
These features make Spark a powerful tool for handling big data tasks that would be too slow or complex for traditional systems.
Save up to 50% on your Databricks spend in a few minutes!


Why Spark with Python?
Python is one of the most popular languages in data science, with millions of developers using it for tasks like machine learning, data analysis, and automation. Its simplicity and readability make it easier to learn and use compared to languages like Scala, Java, or R.
So, why combine Apache Spark with Python? Using Spark through the PySpark API enables developers to scale Python workflows for massive data processing. PySpark allows developers to take their Python code to production, enabling it to process data in parallel across distributed clusters. Unlike using traditional Python libraries such as Pandas or Dask, which are limited by the available memory on a single machine, PySpark efficiently distributes computations and data across multiple nodes, making it ideal for handling large datasets.
What Is Pyspark, Anyway?
PySpark, the Python API for Apache Spark, allows the implementation of Spark applications using Python code, acting as a bridge between Python and the JVM (Java Virtual Machine)-based Spark core. This bridge facilitates smooth integration and interaction between Python code and Spark's distributed processing capabilities. PySpark enables users to process large datasets distributed across a cluster similar to working with smaller datasets on a single machine.

PySpark achieves this by utilizing the Py4J library, which enables dynamic interaction between Python code and Java objects. This is essential since Spark's core is written in Scala, which runs on the JVM. This integration lets Python developers harness Spark’s power for scalable data processing and pipeline development without needing extensive knowledge of Scala or the JVM ecosystem.
PySpark's capability to handle large datasets stems from its distributed computing model, where data is divided and processed across multiple nodes within a cluster. This distributed approach contrasts with single-machine libraries like pandas, which are limited by the memory and processing power of a single machine. PySpark's ability to distribute tasks and data allows it to work with datasets that exceed the capacity of a single machine.
Apache Spark with Python (PySpark) Architecture 101
To understand how Apache Spark with Python(PySpark) works, let's look at PySpark architecture. PySpark operates by wrapping the Apache Spark engine, which is JVM-based, with a Python-friendly API. When a PySpark program is executed, the Python code is translated into a series of Spark tasks that are distributed and executed across multiple worker nodes in a cluster. The Spark engine manages the scheduling, resource allocation, and fault tolerance for these tasks, ensuring efficient and scalable data processing.
PySpark Architecture Diagram:
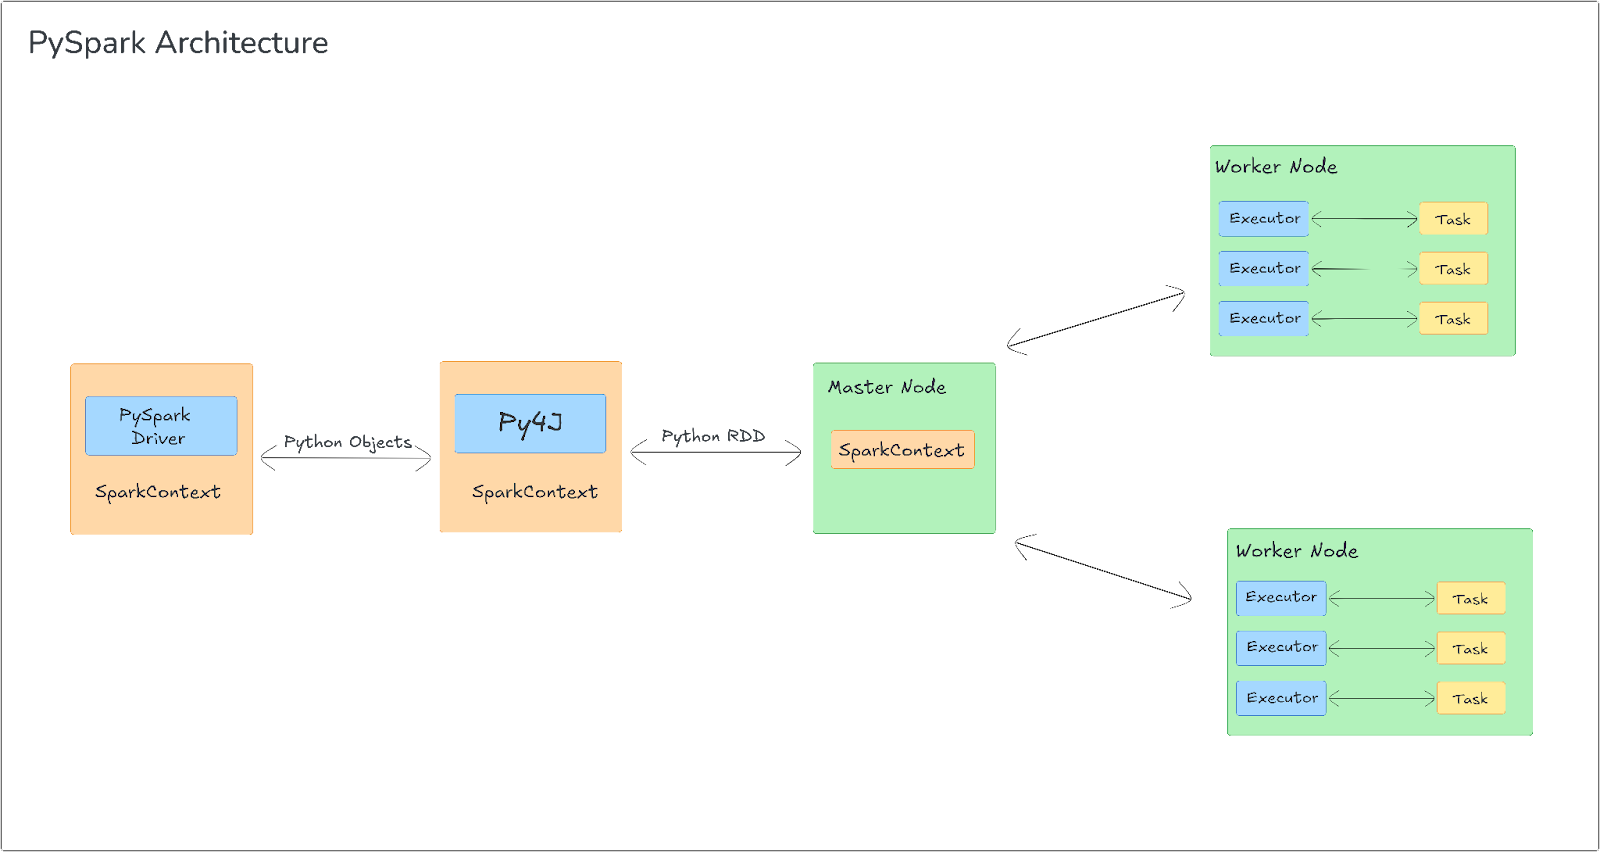
1) Driver Program and SparkContext
In PySpark, the driver program is the entry point of the application. It contains the application logic, defining transformations and actions on distributed datasets (RDDs or DataFrames). The driver is responsible for orchestrating execution by communicating with worker nodes.
The SparkContext (or SparkSession in modern versions) is the main entry point for interacting with Spark's runtime. It initializes the necessary resources for the PySpark application, including launching the JVM process on the local machine using Py4J, a library that facilitates communication between Python and JVM. This creates a JavaSparkContext on the JVM side, ensuring that Spark operations can be managed in the JVM while the application is written in Python.
2) Cluster Manager Integration
PySpark can be deployed across different cluster managers such as YARN, Mesos, Kubernetes, and Spark's native standalone mode. The cluster manager is responsible for resource allocation—distributing CPU and memory resources to run Spark jobs across the cluster.
Once the driver program submits the application, the cluster manager distributes the tasks across the worker nodes based on resource availability. The cluster manager also monitors the health of worker nodes, ensuring fault tolerance by handling task failures and reassigning tasks as necessary. This seamless integration with multiple cluster managers allows PySpark to scale efficiently in distributed environments.
3) Executors and Task Execution
Executors are JVM processes that run on the worker nodes, responsible for executing tasks on partitions of the data. Each worker node in the cluster runs one or more executor processes, which perform operations like filtering, mapping, and aggregating data on behalf of the driver. Executors also store intermediate data in memory (or disk, if necessary) and communicate results back to the driver program.
Task execution in PySpark is based on Spark’s lazy evaluation model. Transformations (such as map or filter) are not executed immediately but are deferred until an action (such as count or collect) is invoked. When an action is triggered, Spark creates a Directed Acyclic Graph (DAG) that represents the sequence of transformations. The DAG is then divided into stages, with each stage consisting of multiple tasks that are distributed across the worker nodes for parallel execution. This parallelism enables PySpark to handle large-scale data processing efficiently.
4) Communication Between Python and JVM (Py4J and TCP Sockets)
PySpark uses Py4J to facilitate communication between the Python driver and the JVM-based Spark engine. Py4J allows Python code to invoke JVM methods, such as operations on RDDs or DataFrames. But, Py4J itself only handles control messages, such as function calls and task orchestration.
For data processing, PySpark serializes Python objects (using Pickle or cloudpickle) and sends them to the JVM, where Spark executes the actual computations. The results are then serialized back to Python for further use in the driver program. This interaction is bidirectional—Python can trigger Spark jobs, and Spark can return results to the Python environment. Data transfers occur via TCP sockets, which enable the efficient exchange of large amounts of serialized data between the Python and JVM processes, ensuring high performance even for distributed workloads.
5) PythonRDD and Worker Nodes
When a PySpark transformation like map or flatMap is called, PySpark serializes the Python function and ships it to the worker nodes. These transformations are wrapped in PythonRDD objects on the JVM side, which manage the serialization and execution of Python code on the workers.
On the worker nodes, Python processes are spawned to execute the transformations on data partitions. The serialized Python code and data are deserialized on the worker, executed locally, and the results are sent back to the JVM. The results from the worker nodes are then communicated back to the driver via TCP sockets. This process ensures that Python-based transformations are executed efficiently in a distributed, parallelized manner.
What is PySpark Used for?
PySpark is versatile and can be used for various big data tasks. Here are some common use cases of PySpark:
1) Big Data Processing
PySpark shines when dealing with large datasets, enabling operations like filtering, grouping, aggregation, and joining across a cluster. This mirrors the functionality of pandas DataFrames, but with the added benefit of Spark's scalability. Imagine cleaning and preparing a dataset with millions of rows—PySpark can handle that efficiently.
2) Machine Learning at Scale
PySpark's MLlib library provides a rich set of algorithms for building and deploying machine learning models on large datasets. This includes algorithms for:
- Classification: Algorithms for categorizing data into predefined classes.
- Regression: Techniques for predicting continuous values based on input features.
- Clustering: Methods for grouping similar data points together.
- Collaborative Filtering: Approaches used in recommendation systems to predict user preferences based on past behavior.
3) Real-time Stream Processing
PySpark's streaming capabilities, enabled by Spark Streaming, allow real-time processing of data streams. This is crucial when you need to analyze and react to data as it arrives, without waiting for batch processing.
4) SQL-like Queries on Big Data
PySpark SQL enables you to query large datasets using familiar SQL syntax. This is particularly useful if you're comfortable with SQL and want to leverage your existing skills for large-scale data analysis. PySpark SQL can also interact with Apache Hive, a data warehouse system built on top of Hadoop.
5) Graph Analysis
PySpark enables graph processing through its GraphFrames library. This allows you to analyze relationships and connections in data, which is valuable for use cases like social network analysis, recommendation engines, or fraud detection.
Step-by-Step Guide to Installing PySpark on Windows, Mac and Linux
Before you can start using PySpark, you need to install it. The installation process varies slightly depending on your operating system.
1) Install PySpark on Windows
To install PySpark on a Windows machine, follow these detailed steps:
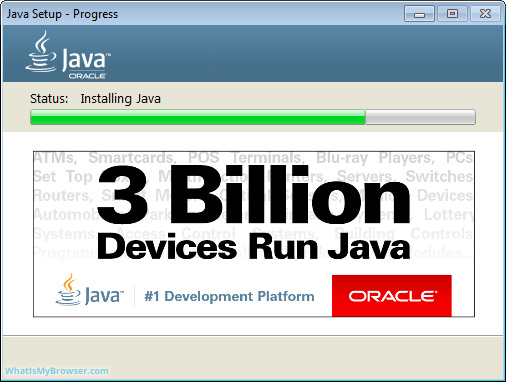
Step 1—Install Java Development Kit (JDK)
First, head over to the Oracle JDK download page and download the latest version of the JDK for Windows.
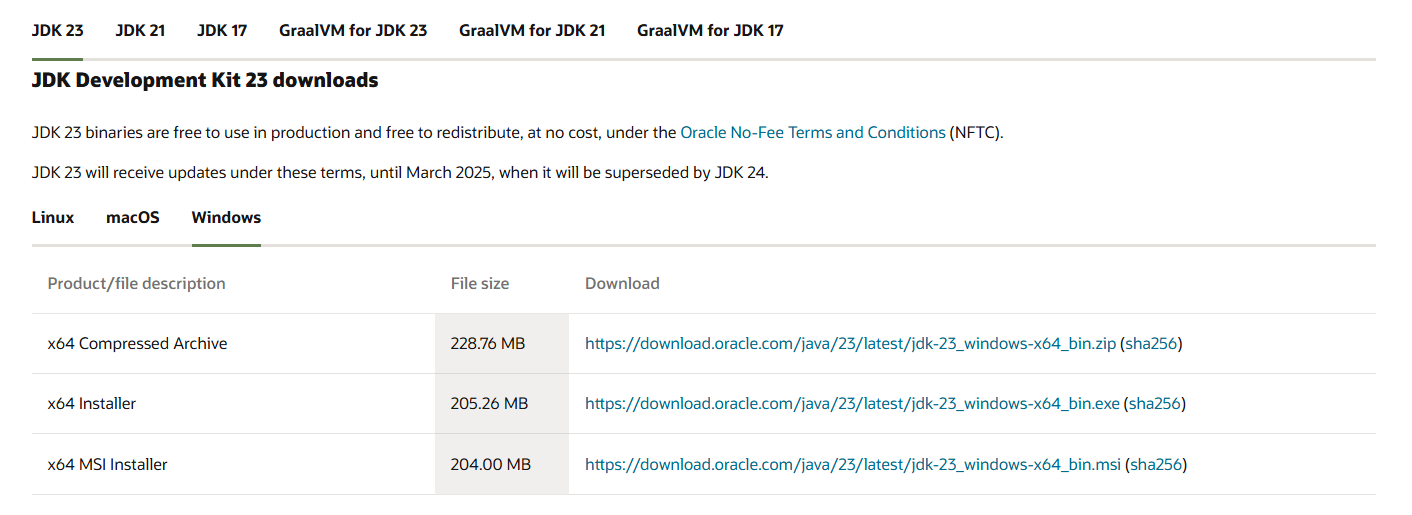
Run the installer and follow the instructions to complete the installation.
Open Command Prompt and type:
java --versionChecking Java Version - Installing PySpark on Windows

Make sure that the version of Java is displayed correctly.
Now, set the Java path. To do so, right-click on "This PC" or "My Computer" and select "Properties". Click on "Advanced system settings", then click on "Environment Variables".
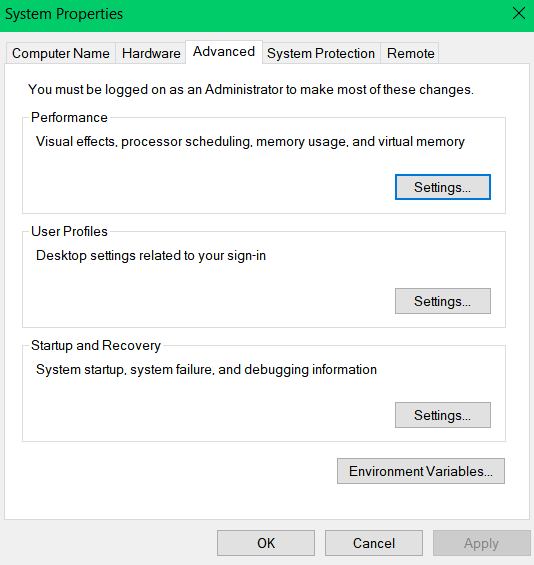
Under "System variables", click "New" and add:
- Variable name: JAVA_HOME
- Variable value: Path to your JDK installation, e.g., C:\Program Files\Java\jdk-18.0.x (adjust based on your installation).
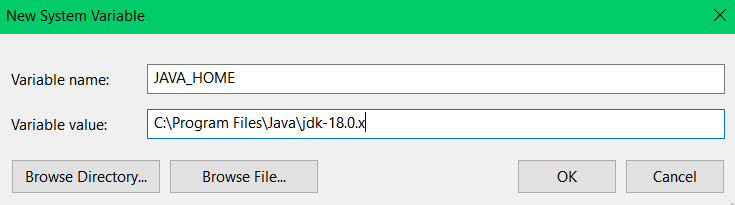
Finally, update Path Variable. To do so, find the Path variable in the "System variables" section, select it, and click "Edit" and then add a new entry: %JAVA_HOME%\bin.
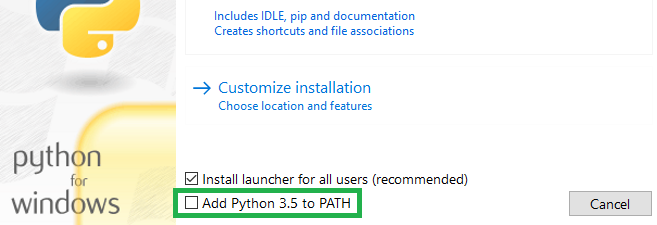
Step 2—Install Python (if not already installed)
Next, download Python. To do so, head over to Python's official website and download Python 3.x. And then, run the installer, ensuring you check "Add Python to PATH".
Open Command Prompt and type:
python --versionChecking Python version - Installing PySpark on Windows

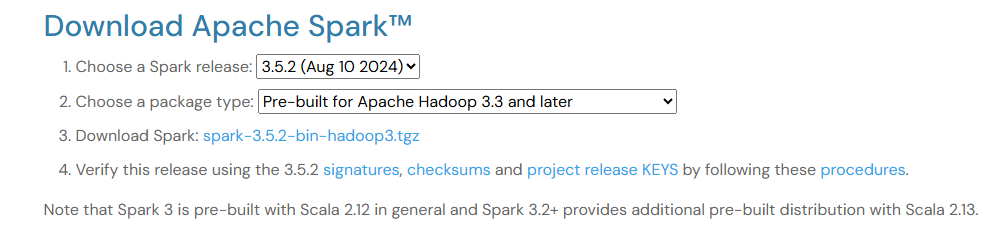
Step 3—Install Apache Spark
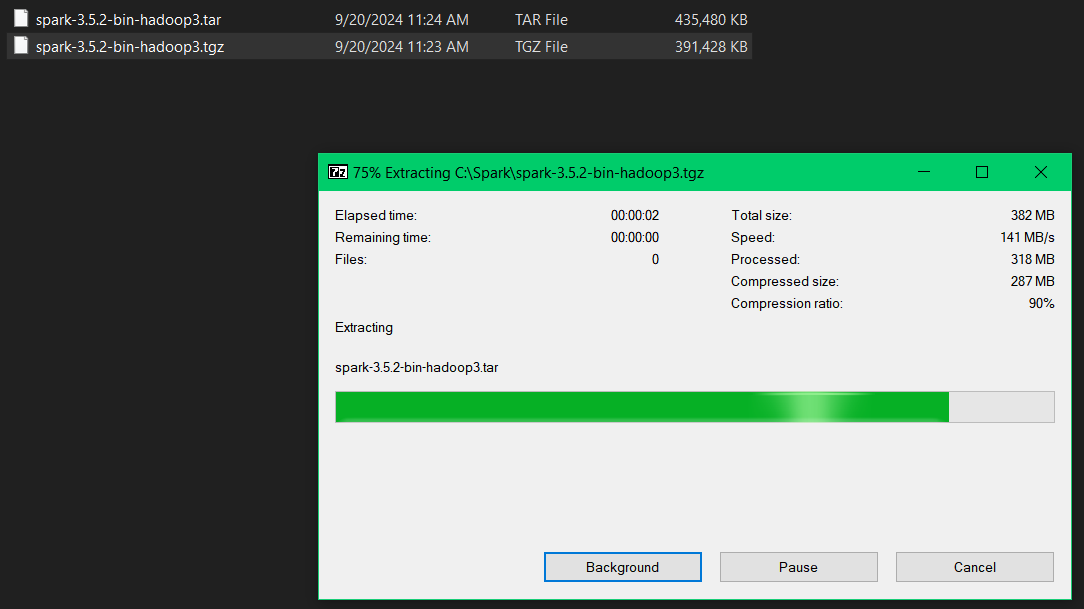
To download Apache Spark. Go to the Apache Spark download page and select a pre-built version for Hadoop.
Extract Spark Files. Create a directory for Spark, e.g., C:\spark, and extract the downloaded Spark .tgz file into this directory.
Step 4—Download and Install winutils
Head over to Winutils repository and download winutils.exe corresponding to your Hadoop version (e.g., Hadoop 3)
Now, create a folder named “C:\winutils\bin” and place winutils.exe inside it.
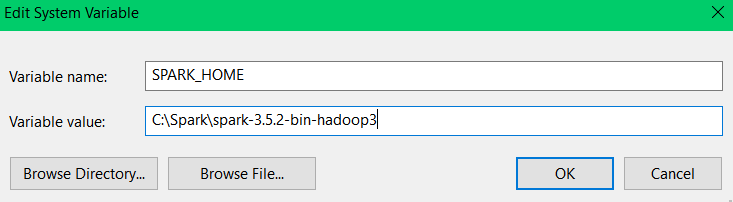
Step 5—Set Up Environment Variables for Spark
To configure the necessary environment variables, start by adding SPARK_HOME. Open the Environment Variables window, create a new variable with the name SPARK_HOME, and set its value to the path of your extracted Spark folder, for example, C:\spark\spark-3.x.x-bin-hadoopx.x, adjusting it accordingly to your setup.
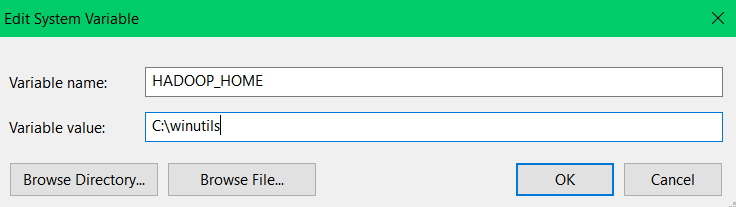
Next, add HADOOP_HOME by creating another variable named HADOOP_HOME, and set its value to C:\winutils.
Once these variables are set, update the system's Path variable by editing it and adding the following entries:
%SPARK_HOME%\bin
%HADOOP_HOME%\bin
Updating the system’s Path variable - Installing PySpark on Windows
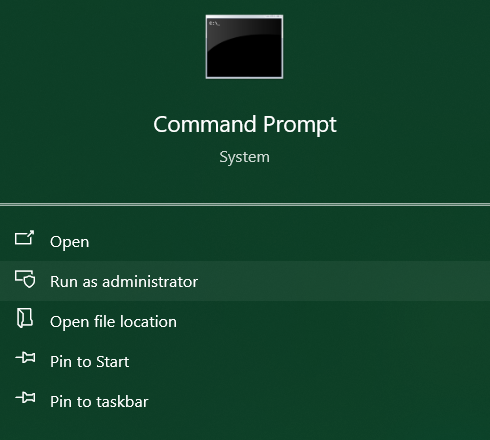
Step 6—Install PySpark via pip
Now to install PySpark via pip. First, open Command Prompt as Administrator.
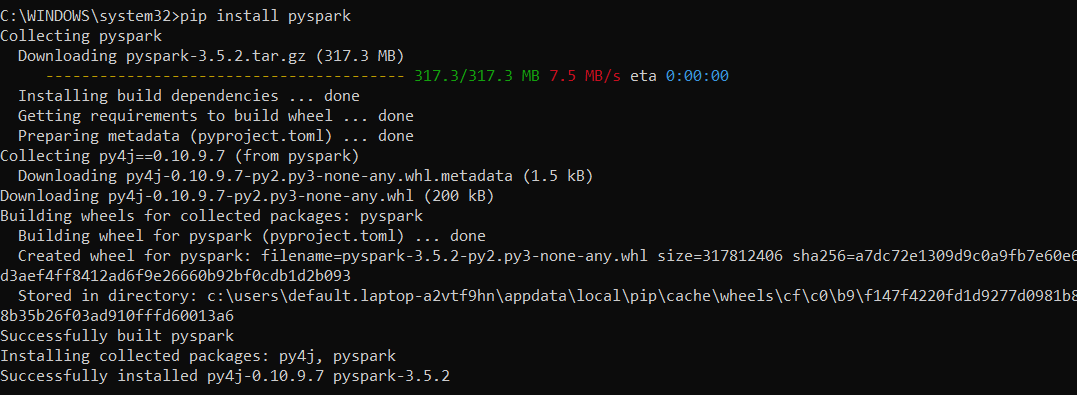
Run pip install command:
pip install pysparkInstalling PySpark on Windows using pip - Apache Spark with Python - PySpark
Step 7—Verify PySpark Installation
To verify PySpark installation, head over to your Command Prompt and type:
pyspark --versionChecking PySpark version - Installing PySpark on Windows
You should see the installed version of PySpark displayed.
2) Installing PySpark on Mac
Step 1—Install Homebrew (if not already installed)
Homebrew is a package manager for macOS that simplifies the installation of software. Open your terminal and run the following command to install Homebrew:
/bin/bash -c "$(curl -fsSL https://raw.githubusercontent.com/Homebrew/install/HEAD/install.sh)"Installing Hombrew on macOs - Installing PySpark on Mac - Apache Spark with Python
After installation, you may need to add Homebrew to your path with:
echo 'eval "$(/opt/homebrew/bin/brew shellenv)"' >> /Users/$(whoami)/.zprofile
eval "$(/opt/homebrew/bin/brew shellenv)"
Adding Hombrew path - Installing PySpark on Mac - Apache Spark with Python

Step 2—Install Java Development Kit (JDK)
PySpark requires Java to run. You can install OpenJDK using Homebrew. In your terminal, execute:
brew install openjdkInstalling Java on Mac - Installing PySpark on Mac
After installation, verify that Java is installed correctly by checking the version:
java -versionChecking Java version - Installing PySpark on Mac

Step 3—Install Python
Make sure you have Python 3.x installed on your system. If it’s not installed, you can install it via Homebrew:
brew install pythonInstalling Python via Homebrew - Installing PySpark on Mac
Verify the installation by checking the Python version:
python3 --versionVerifying Python installation - Installing PySpark on Mac

Step 4—Install PySpark via Pip
With Java and Python set up, you can now install PySpark using pip (Python's package manager). Run the following command in your terminal:
pip3 install pysparkInstalling PySpark via pip - Installing PySpark on Mac
This will download and install the latest version of PySpark along with its dependencies.
Step 5—Set Up Environment Variables (Optional)
To make sure that PySpark works seamlessly with Jupyter Notebook and other tools, you may want to set up some environment variables. Open your .bash_profile or .zprofile file in a text editor:
open -e ~/.bash_profileSetting up PySpark Environment Variable - Installing PySpark on Mac
Add the following lines to the file:
export PYTHONPATH=$SPARK_HOME/python/:$PYTHONPATH
export PYSPARK_DRIVER_PYTHON="jupyter"
export PYSPARK_DRIVER_PYTHON_OPTS="notebook"
Setting up PySpark Environment Variable - Installing PySpark on Mac
Save the file and reload it by running:
source ~/.bash_profileSetting up PySpark Environment Variable - Installing PySpark on Mac
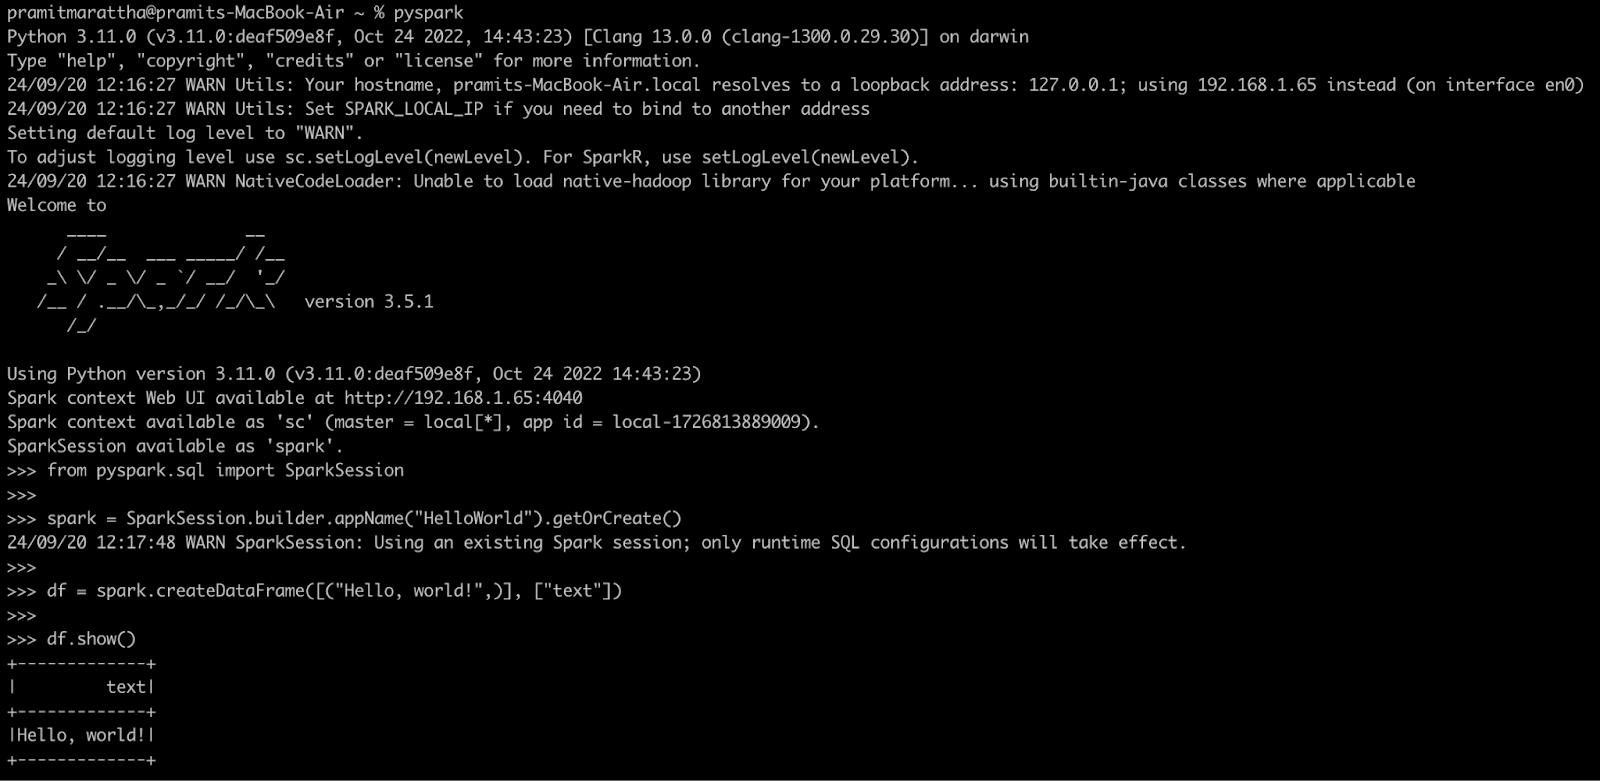
Step 7—Verify PySpark Installation
To test your installation, you can start the PySpark shell by simply typing:
pyspark --versionVerifying PySpark Installation - Installing PySpark on Mac
Now, start PySpark by typing in Command Prompt:
pysparkVerifying PySpark Installation - Installing PySpark on Mac
In the interactive shell, run a simple command to test your setup:
from pyspark.sql import SparkSession
spark = SparkSession.builder.appName("HelloWorld").getOrCreate()
df = spark.createDataFrame([("Hello, world!",)], ["text"])
df.show()
Verifying PySpark Installation - Installing PySpark on Mac
If everything is set up correctly, you should see an output displaying "Hello, world!".
Congratulations! You have successfully installed PySpark on your macOS!
3) Installing PySpark on Linux
Refer to the official documentation specific to your distribution (Ubuntu/CentOS) for detailed installation steps.
Core Components of PySpark
PySpark includes several core components that you'll use frequently in your applications. Let's explore each of these:
Resilient Distributed Datasets (RDDs)
Resilient Distributed Datasets (RDDs) are the fundamental abstraction in Apache Spark. They represent a collection of objects that can be processed in parallel across a cluster of machines. RDDs are designed to handle fault tolerance and enable distributed computing.
Key characteristics of PySpark RDDs are:
- Immutability — Once created, PySpark RDDs cannot be modified. However, you can perform transformations that produce new RDDs.
- Partitioning — PySpark RDDs are automatically divided into partitions and distributed across nodes in a cluster, allowing parallel processing.
- Lazy Evaluation — PySpark RDD transformations (e.g., map, filter) are lazy, meaning they are not executed until an action (e.g., collect, saveAsTextFile) is called. This allows Spark to optimize the execution plan before running tasks.
- Fault Tolerance — PySpark RDDs track lineage information, which allows them to be recomputed from scratch in case of node failures.
Here's a simple example demonstrating how to create and manipulate RDDs in PySpark:
from pyspark import SparkContext

sc = SparkContext("local", "RDD Example")

data = [1, 2, 3, 4, 5]
rdd = sc.parallelize(data)

squared_rdd = rdd.map(lambda x: x * x)

results = squared_rdd.collect()
print(results)
Creating and manipulating RDDs in PySpark - Apache Spark with Python
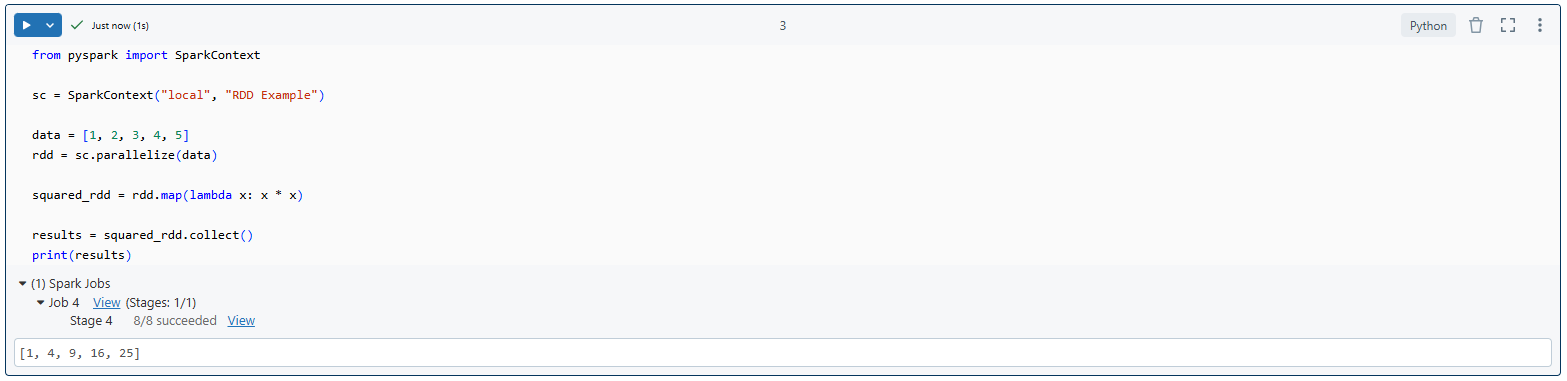
As you can see, first we create a SparkContext. This is essentially the driver program that coordinates the distributed processing. Next, we define a Python list of numbers. This list will be the source data for our PySpark RDD.
Then, we create an PySpark RDD from this list using the parallelize method. This method distributes the elements of the list across multiple partitions on the cluster, allowing for parallel processing. And then we performed some transformation to that RDD. Finally, we collect all the elements from the PySpark RDD and print them.
DataFrames and Spark SQL
DataFrames
DataFrames are a higher-level abstraction built on top of RDDs that provide a more efficient way to work with structured data. They are similar to tables in relational databases or DataFrames in pandas and allow for optimized query execution.
DataFrames vs RDDs
- Unlike RDDs, DataFrames have a defined schema, allowing SQL-like queries on structured data.
- DataFrames benefit from internal optimizations, making them faster for querying and analyzing structured data.
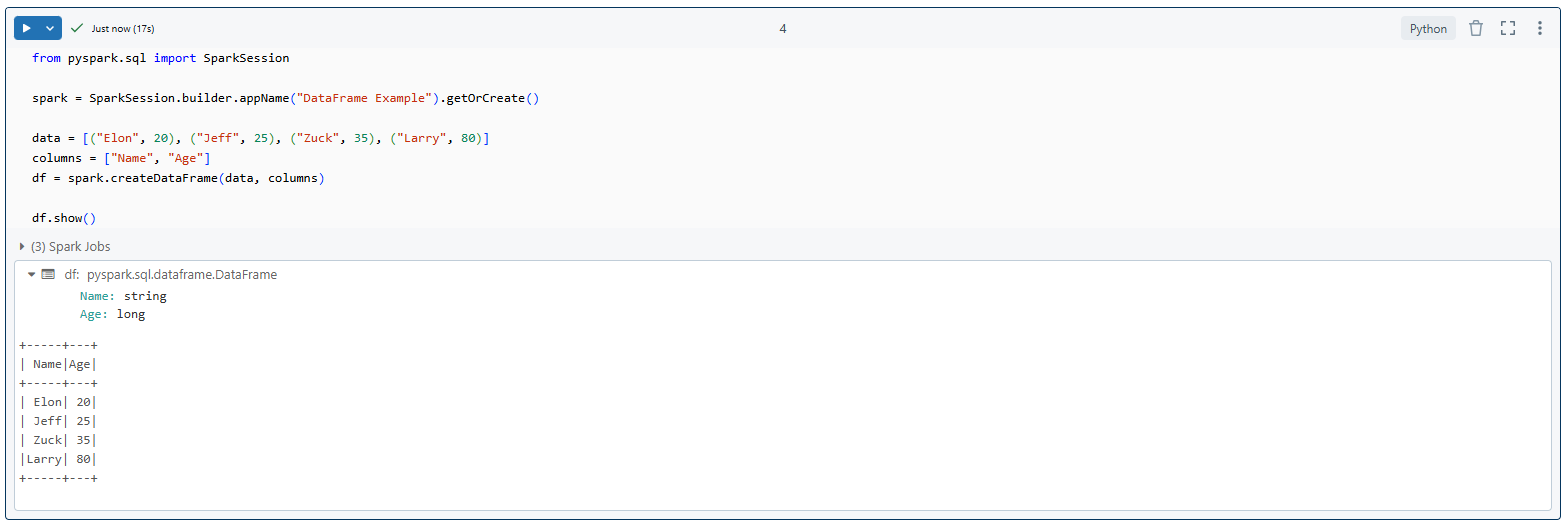
Here's an example of creating and working with a DataFrame in PySpark:
from pyspark.sql import SparkSession

# Create a SparkSession
spark = SparkSession.builder.appName("DataFrame Example").getOrCreate()

# Create a DataFrame from a list of tuples
data = [("Alice", 30), ("Bob", 25), ("Charlie", 35)]
columns = ["Name", "Age"]
df = spark.createDataFrame(data, columns)

# Show the DataFrame
df.show()
Creating and working with DataFrame - Apache Spark with Python - PySpark DataFrames
filtered_df = df.filter(df["Age"] > 30)
filtered_df.show()
Filter the PySpark DataFrames

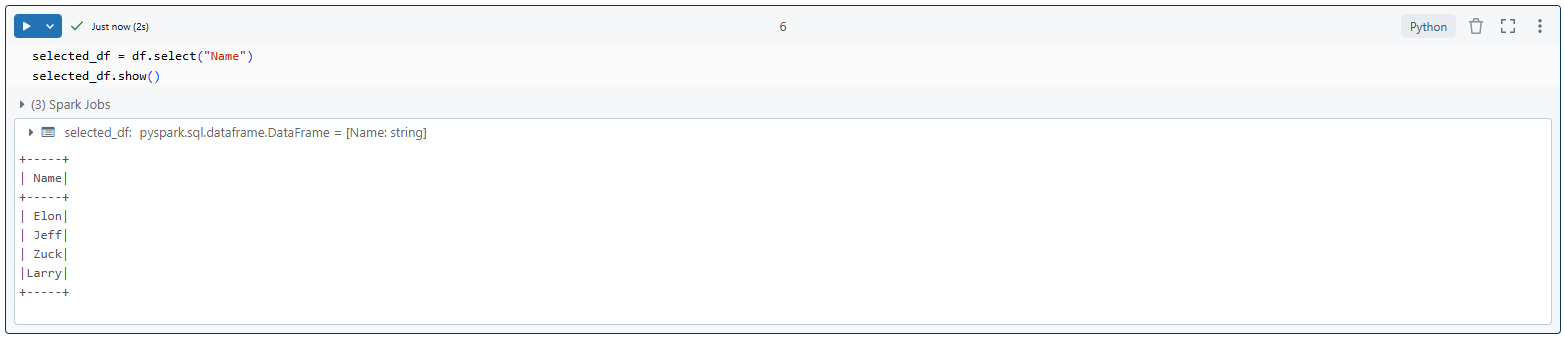
selected_df = df.select("Name")
selected_df.show()
Select specific columns
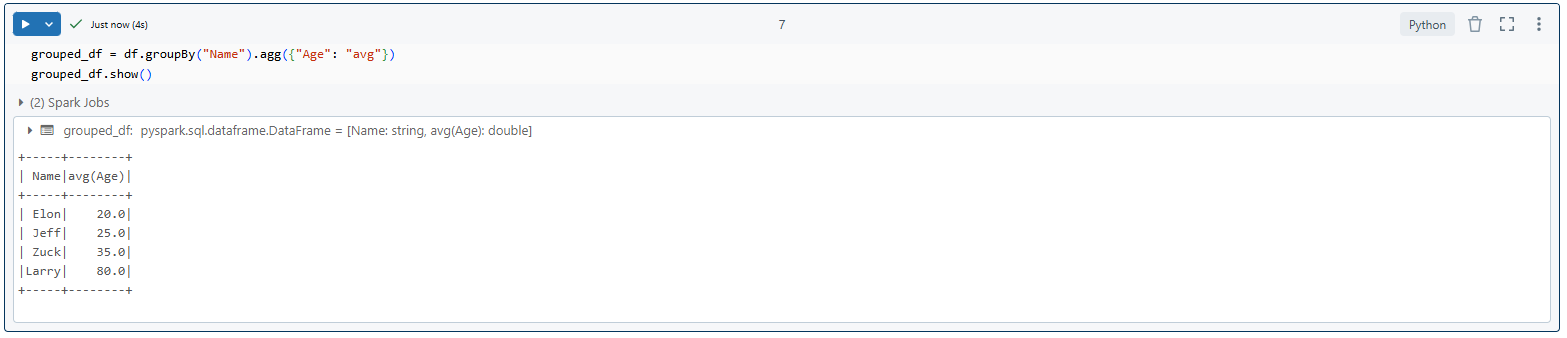
grouped_df = df.groupBy("Name").agg({"Age": "avg"})
grouped_df.show()
Group by a column and aggregate
As you can see, we first create a SparkSession to provide the entry point for our Spark application. Then, we create a DataFrame from a list of tuples representing our data. Next, we demonstrate various DataFrame operations, such as filtering, selecting columns, grouping, and aggregating data. Finally, we print the results of these operations.
Spark SQL
Spark SQL is a module for working with structured data. It allows you to query data using SQL, while still leveraging Spark's distributed computing capabilities.
Here's an example of using Spark SQL in Python:
spark = SparkSession.builder.appName("Spark SQL example").getOrCreate()

df = spark.createDataFrame([
    (1, "Elon Musk", 25),
    (2, "Larry Page", 30),
    (3, "Jeff Bezos", 35),
    (4, "Jeff Bezos", 45)
], ["id", "name", "age"])

df.createOrReplaceTempView("people")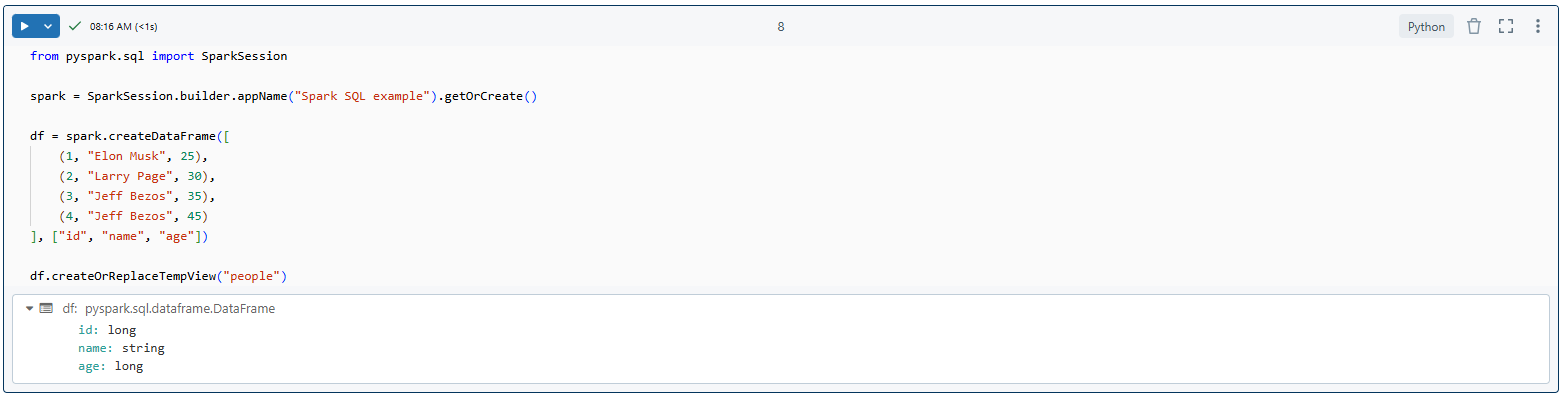
result = spark.sql("SELECT * FROM people WHERE age > 28")
result.show()
Creating and working with Spark SQL
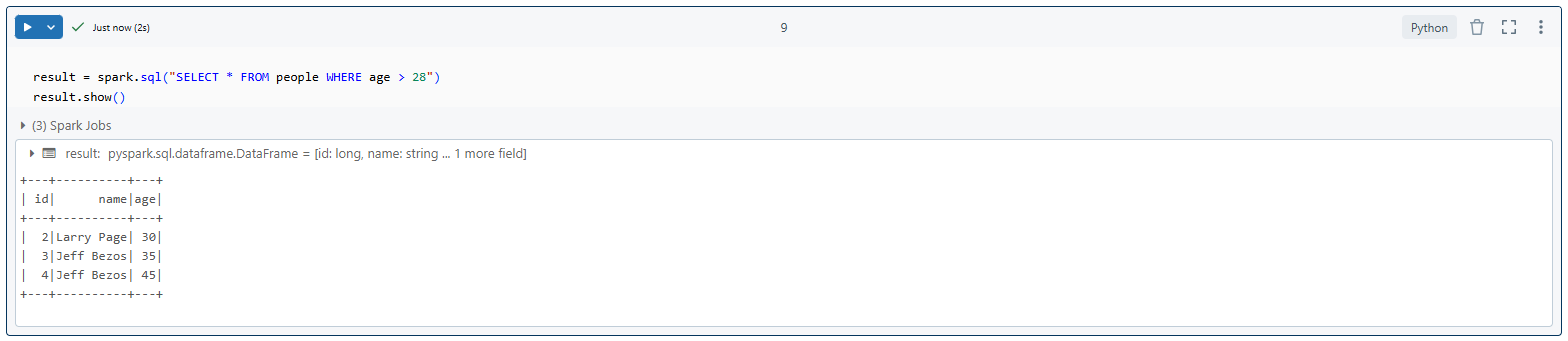
In this example, we create a DataFrame, register it as a temporary view, and then run a SQL query on it.
Structured Streaming (Spark Streaming)
Spark Streaming enables processing real-time data streams. It divides the input stream into batches for processing.
Here’s how you might set up a simple streaming application:
from pyspark import SparkContext
from pyspark.streaming import StreamingContext

# Initialize SparkContext
sc = SparkContext.getOrCreate()

# Creating a StreamingContext with a batch interval of 1 second
ssc = StreamingContext(sc, 1)

# Creating a DStream to read lines from the standard input
lines = ssc.textFileStream("path/to/your/input/directory")

# Count the words in each line
counts = lines.flatMap(lambda line: line.split()).map(lambda word: (word, 1)).reduceByKey(lambda a, b: a + b)

# Print the word counts every 5 seconds
counts.pprint(5)

# Start the streaming computation
ssc.start()

# Keep the main thread running to prevent the program from exiting
ssc.awaitTermination()
Configuring Streaming application in PySpark
sc = SparkContext.getOrCreate()Initialize SparkContext
ssc = StreamingContext(sc, 1)Creating a StreamingContext with a batch interval of 1 second
lines = ssc.textFileStream("path/to/your/input/directory")Creating a DStream to read lines from the standard input
counts = lines.flatMap(lambda line: line.split()).map(lambda word: (word, 1)).reduceByKey(lambda a, b: a + b)Count the words in each line
counts.pprint(5)Print the word counts every 5 seconds
ssc.start()Start the streaming computation
ssc.awaitTermination()Keep the main thread running to prevent the program from exiting
As you can see, we first create a SparkContext and a StreamingContext to set up the Spark streaming environment. Then, we create a DStream to continuously read lines from a specified directory. Next, we perform word count operations on each batch of data, using flatMap, map, and reduceByKey. Finally, we print the word counts every 5 seconds to visualize the results in real-time.
MLlib (Machine Learning Library)
MLlib is Spark's machine learning library. It provides a wide range of machine learning algorithms, including classification, regression, clustering, and collaborative filtering. MLlib in PySpark focuses on the DataFrame-based API (pyspark.ml), which is more flexible and offers better performance than the RDD-based API (pyspark.mllib).
Here's a simple example of using MLlib to train a logistic regression model:
from pyspark.sql import SparkSession
from pyspark.ml.linalg import Vectors
from pyspark.ml.classification import LogisticRegression
from pyspark.ml.feature import VectorAssembler

spark = SparkSession.builder.appName("MLlibExample").getOrCreate()

data = [
    (1.0, Vectors.dense([0.0, 1.1, 0.1])),
    (0.0, Vectors.dense([2.0, 1.0, -1.0])),
    (0.0, Vectors.dense([2.0, 1.3, 1.0])),
    (1.0, Vectors.dense([0.0, 1.2, -0.5]))
]

df = spark.createDataFrame(data, ["label", "features"])

lr = LogisticRegression(maxIter=10, regParam=0.01)

model = lr.fit(df)

predictions = model.transform(df)

predictions.select("label", "features", "prediction", "probability").show()

spark.stop()
Using MLlib to train a logistic regression model
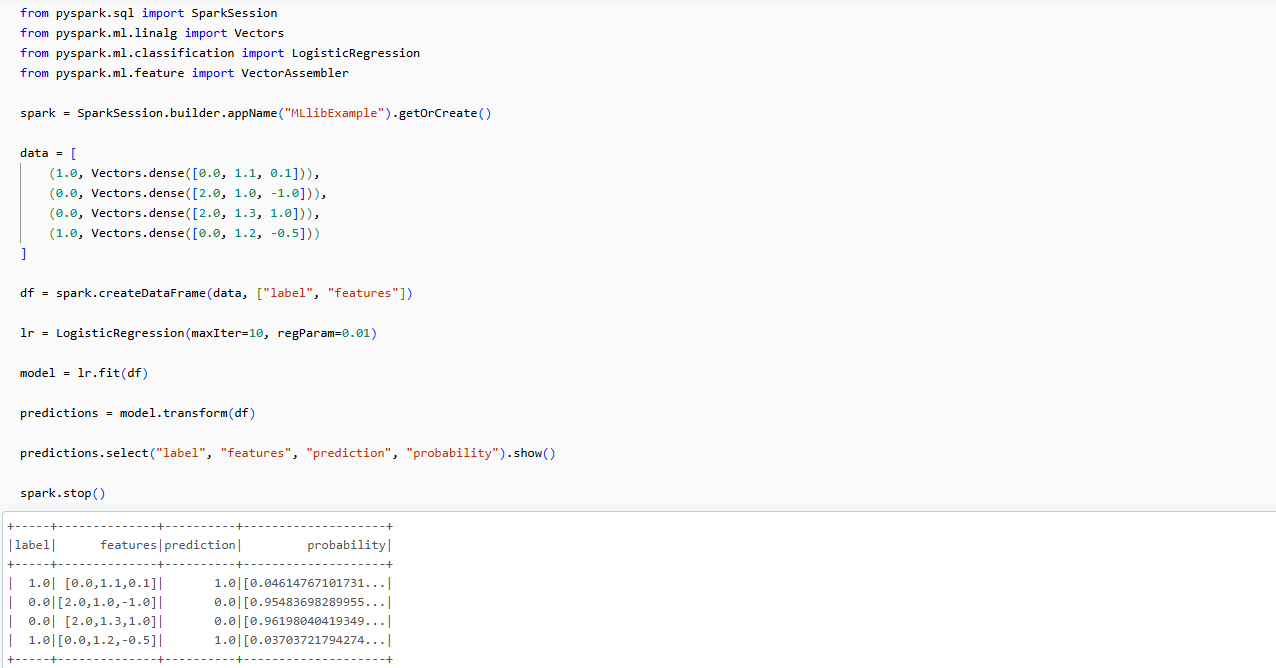
You can see, we first created a SparkSession to initialize our Spark environment. Then, we defined a small dataset directly in the code, consisting of four data points, each with three features and a binary label. We converted this data into a Spark DataFrame. Next, we instantiated a LogisticRegression model from MLlib. Then, we fitted this model to our data. After training, we used the model to make predictions on the same data. Finally, we printed out the results, showing the original labels, features, predicted labels, and prediction probabilities for each data point.
GraphFrames
GraphFrames is a package for Apache Spark that provides DataFrame-based Graphs. It provides high-level APIs in Scala, Java, and Python, and aims to provide both the functionality of GraphX and extended functionality taking advantage of Spark DataFrames.
Check out this article for a thorough tutorial on how to use GraphFrames.
Resource Management
The Resource component in PySpark, introduced in Spark 3.0, provides APIs for managing resources like GPUs. It allows you to specify resource requirements for your Spark applications and manage how these resources are allocated to tasks.
Check out this article on how you might use the Resource component.
Hands-on Example: Step-by-Step Guide to Data Analysis with PySpark
Now that we've covered the basics and installation, let's walk through a hands-on example of data analysis with PySpark.
Step 1—Initialize PySpark SparkSession
First, we need to create a SparkSession, which is the entry point for PySpark functionality:
from pyspark.sql import SparkSession

spark = SparkSession.builder.appName("Data Analysis").getOrCreate()
Initialize PySpark SparkSession - PySpark tutorial
Step 2—Load Data into PySpark DataFrame
Next, load the data into a DataFrame:
df = spark.read.csv("data.csv", header=True, inferSchema=True)Loading Data into DataFrame - PySpark SparkSession - Apache Spark with Python
If you want to follow along with this article, here is a sample dataset that you can use for your data.csv file. This dataset contains 50 entries with random/fictional data about individuals, including their names, ages, occupations, and salaries.
Name,Age,Occupation,Salary
Elon,40,Rocket Scientist,95000
Jeff,45,Software Engineer,105000
Mark,25,Web Developer,70000
Bill,37,System Analyst,85000
Oprah,29,Data Analyst,80000
Warren,50,Project Manager,120000
Sergey,38,UX Designer,75000
Sheryl,40,Database Administrator,90000
Larry,38,Solution Architect,115000
Melinda,32,Business Analyst,88000
Richard,57,Cybersecurity Specialist,92000
Susan,36,Machine Learning Engineer,110000
Harry,42,Scrum Master,95000
Jacqueline,41,Business Intelligence Developer,87000
Amancio,26,System Administrator,65000
Mackenzie,39,Business Consultant,99000
Steve,33,Bioinformatics Scientist,102000
Frank,30,Digital Marketing Specialist,78000
Bernard,48,CFO,150000
Alicje,34,Sales Engineer,87000
Abigail,29,Nurse Practitioner,95000
David,41,Venture Capital Analyst,130000
Gina,37,Chemical Engineer,105000
Ejon,24,Jr. Data Scientist,68000
Laurene,38,Risk Manager,98000
Sara,28,E-commerce Manager,72000
Michael,43,Firmware Engineer,98000
Julia,26,Psychologist Assistant,60000
Roman,39,Civil Engineer,100000
Miriam,32,Epidemiologist,92000
Brian,29,Graphic Designer,74000
Zhou,36,Content Strategist,88000
Charles,45,IT Support Specialist,65000
Alice,31,HR Manager,85000
Michael,27,Research Scientist,97000
Larry,40,Network Engineer,93000
Robert,34,Product Owner,105000
Jerrry,28,SEO Specialist,76000
Ken,38,Quantitative Analyst,110000
Yusaku,33,Technical Writer,82000
Phil,42,Web Designer,88000
Aliko,30,Financial Analyst,91000
Jorge,25,Operations Manager,70000
Zhang,41,Public Relations Specialist,77000
Masayoshi,35,Supply Chain Manager,94000
Charles,29,Market Research Analyst,72000
Zara,36,Sales Manager,99000
Li,28,Software Tester,74000
Jimmmy,44,Compliance Officer,99000
Save this as a “data.csv” file.
Step 3—Explore the Data
Let's take a look at our data:
df.printSchema()
df.show(5)
df.describe().show()
Exploring Data - Apache Spark with Python
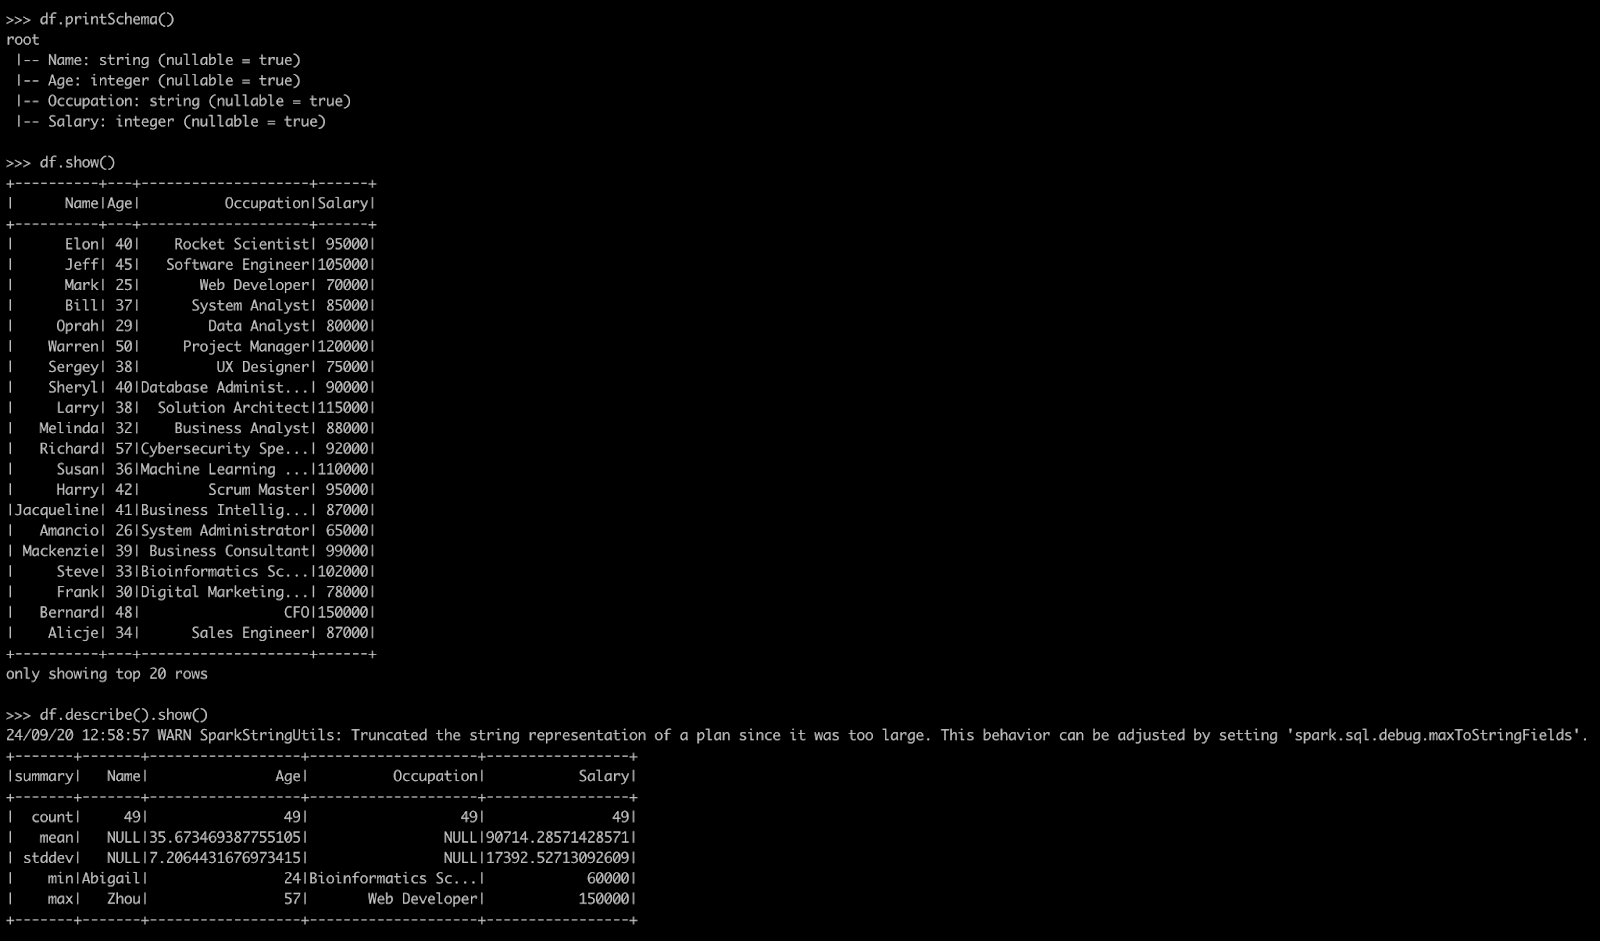
This will show us the schema, the first 5 rows, and basic statistics of our dataset.
Step 4—Data Cleaning and Preparation
We'll perform some basic cleaning and preparation. Below are the key operations we will undertake:
1) Convert Salary to Numeric: Remove any non-numeric characters and cast the salary column to an integer type.
2) Handle Null Values: Drop any rows that contain null values.
3) Create Salary Category: Categorize salaries into "Low," "Medium," and "High" based on predefined thresholds.
Here’s how we implement these steps:
from pyspark.sql.functions import col, whendf = df.withColumn("Salary", col("Salary").cast("int"))Convert salary to numeric
df = df.na.drop()Handle null values
df = df.withColumn("SalaryCategory",
                   when(col("Salary") < 80000, "Low")
                   .when((col("Salary") >= 80000) & (col("Salary") < 100000), "Medium")
                   .otherwise("High"))
Create a new column for salary category
df.show()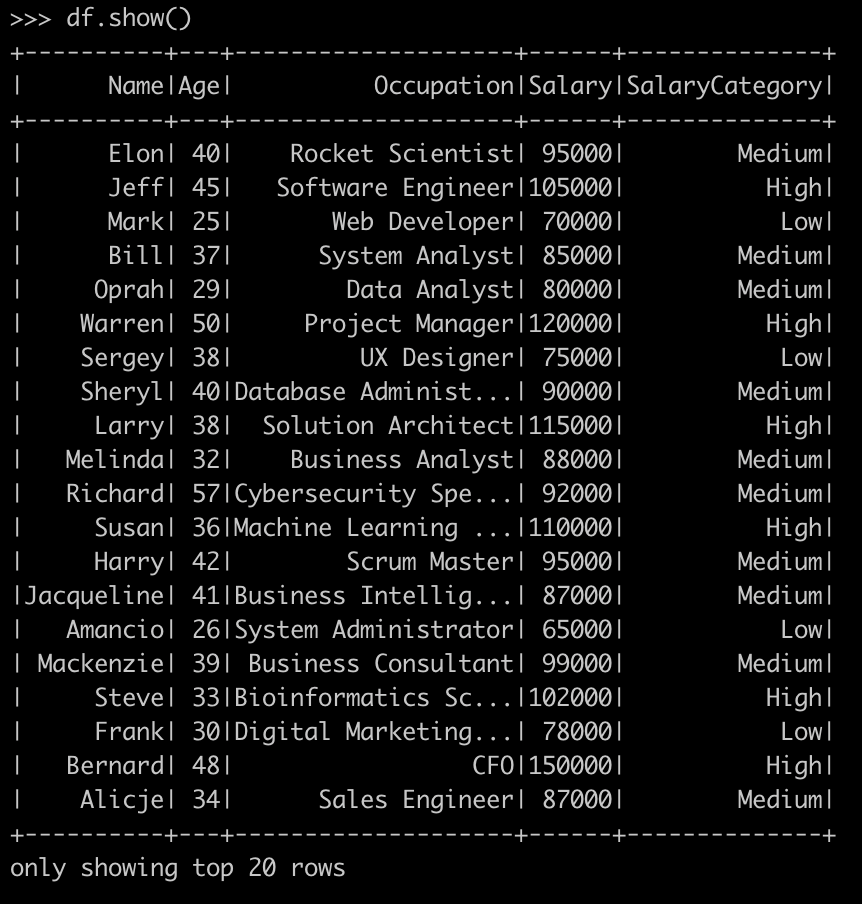
Step 5—Data Transformation
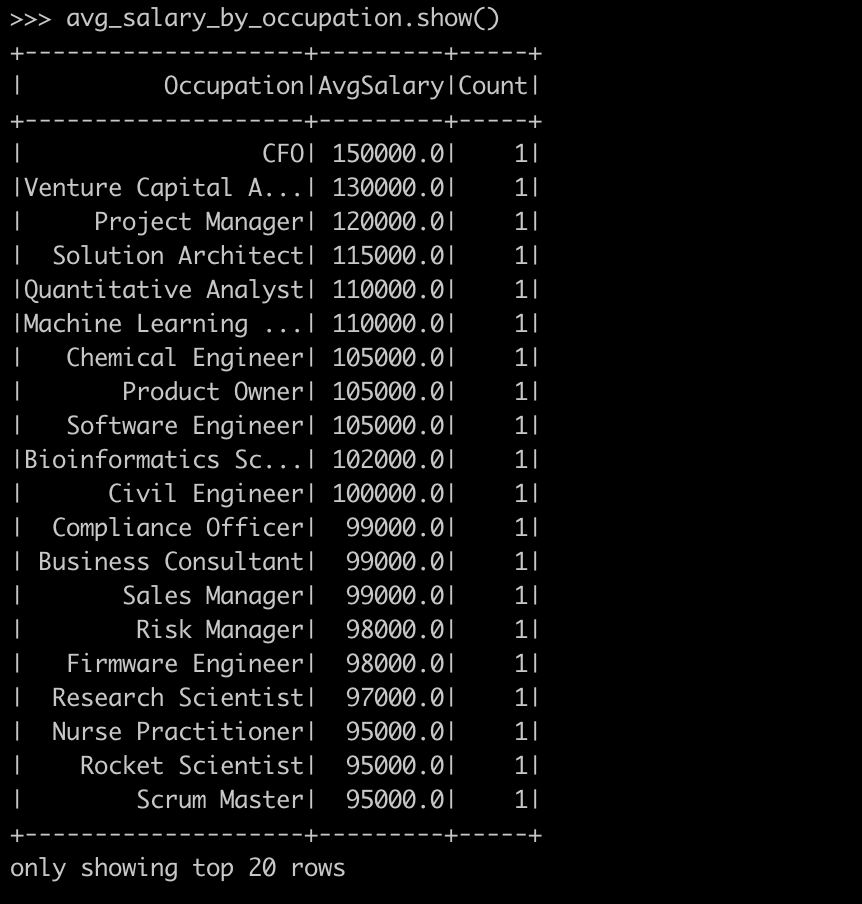
With our data cleaned and prepared, we can now perform some transformations to analyze it. First, we will evaluate the average salary by occupation and count how many entries exist for each occupation. Then, we'll analyze the age distribution in our dataset.
from pyspark.sql.functions import avg, count1) Evaluating average salary by occupation
avg_salary_by_occupation = df.groupBy("Occupation") \
    .agg(avg("Salary").alias("AvgSalary"), count("*").alias("Count")) \
    .orderBy("AvgSalary", ascending=False)

avg_salary_by_occupation.show()  # Display average salary by occupation
Evaluating average salary by occupation - PySpark tutorial - Data Analysis with PySpark
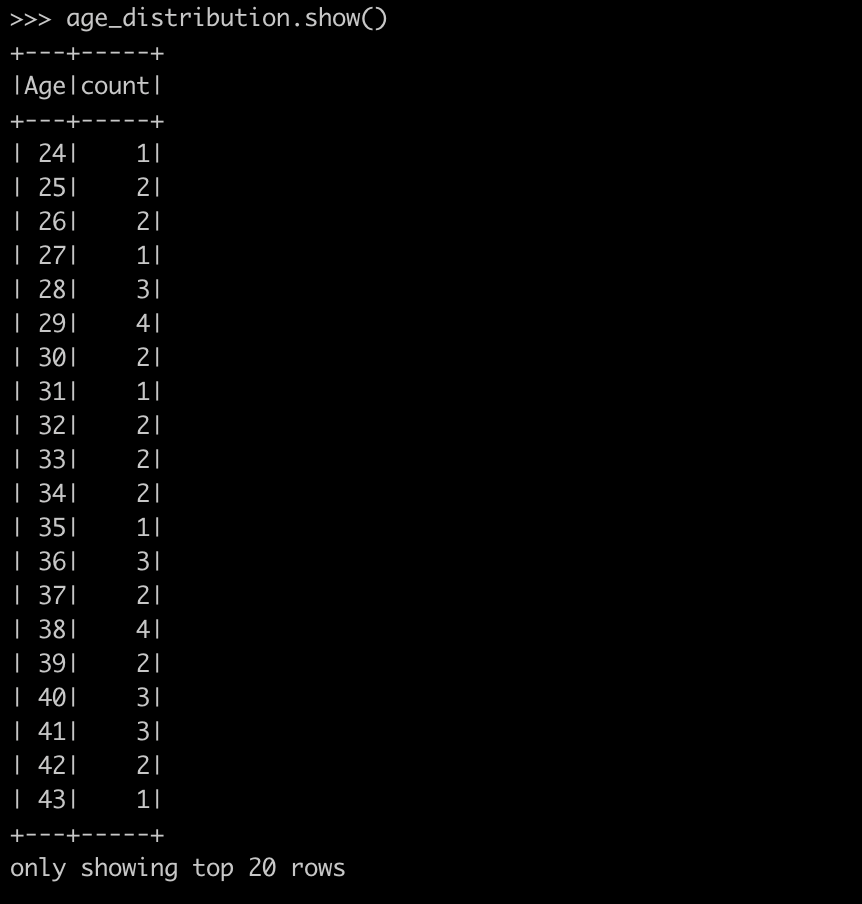
2) Evaluating age distribution
age_distribution = df.groupBy("Age") \
    .count() \
    .orderBy("Age")
age_distribution.show()
Evaluating age distribution - PySpark tutorial - Data Analysis with PySpark
Step 6—Perform Exploratory Data Analysis
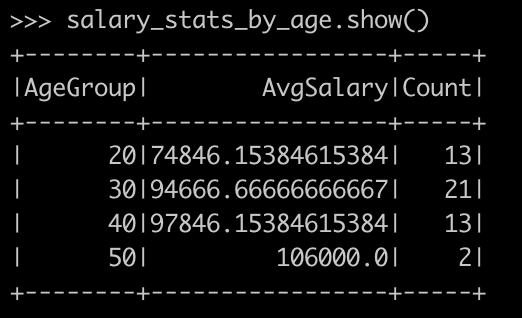
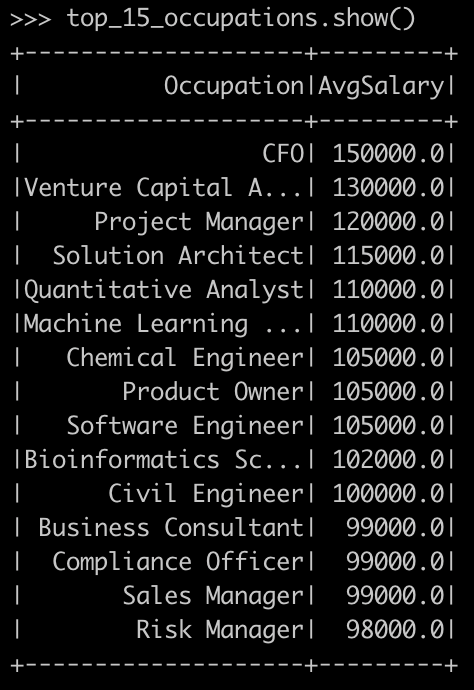
Next, let's dive deeper into our data through exploratory analysis. We will first calculate the correlation between age and salary. Then, we will evaluate salary statistics by grouping ages into decades. Lastly, we will identify the top 15 highest-paying occupations.
First, let's find out some correlation between age and salary.
correlation = df.stat.corr("Age", "Salary")
print(f"Correlation between Age and Salary: {correlation}")
Evaluating the correlation between age and salary - PySpark tutorial - Data Analysis with PySpark

Next, let's evaluate salary statistics by age group.
from pyspark.sql.functions import floor

df = df.withColumn("AgeGroup", floor(df.Age / 10) * 10)

salary_stats_by_age = df.groupBy("AgeGroup") \
    .agg(avg("Salary").alias("AvgSalary"),
         count("*").alias("Count")) \
    .orderBy("AgeGroup")

salary_stats_by_age.show()
Evaluating salary statistics by age group - PySpark tutorial - Data Analysis with PySpark
Lastly, let's list out the Top 15 highest-paying occupations.
top_15_occupations = df.groupBy("Occupation") \
    .agg(avg("Salary").alias("AvgSalary")) \
    .orderBy("AvgSalary", ascending=False) \
    .limit(15)

top_15_occupations.show()
Evaluating top 15 highest paying occupations - PySpark tutorial - Data Analysis with PySpark
Step 7—Save the Results
Finally, after completing our analysis, we can save our results for future reference.
To save as CSV, use the following command:
avg_salary_by_occupation.write.csv("avg_salary_by_occupation.csv", header=True)


df.write.parquet("employee_data.parquet")
Saving the result as CSV file
To save as Parquet, use:
df.write.parquet("employee_data.parquet")Saving the result as Parquet file
Step 9—Stop the Spark Session
Once we're done with our analysis and have saved our results, it's important to stop the Spark session to free up resources. To do so:
spark.stop()Stopping the Apache Spark session
That’s it! Congrats! You have successfully performed Data Analysis with PySpark.
Want to take Chaos Genius for a spin?
It takes less than 5 minutes.

Conclusion
And that's a wrap! PySpark, the Python API for Apache Spark, is extremely powerfull. It lets data engineers and scientists handle big data tasks, real-time streaming, machine learning, and analytics. They can do this efficiently, using Python's simplicity and flexibility. Remember, PySpark is most beneficial when working with large datasets that don't fit into the memory of a single machine. For smaller datasets, simpler library/tool like pandas might be more appropriate. But when you need to scale your data processing, PySpark provides a powerful and flexible solution.
In this article, we have covered:
- What is Apache Spark?
- Why Spark with Python?
- What is PySpark?
- PySpark Architecture 101
- What is PySpark Used for?
- Core Components of PySpark
- Step-by-Step Guide to Installing PySpark on Windows, Mac and Linux
- Hands-on Example: Step-by-Step Guide to Data Analysis with PySpark
FAQs
Can I use Apache Spark in Python?
Yes, you can use Apache Spark with Python through PySpark, which is Spark's Python API.
Is PySpark the same as Apache Spark?
PySpark is the Python API for Apache Spark. It allows you to use Spark's capabilities in Python, but it's not exactly the same as the core Spark, which is written in Scala.
Why use Python with Spark?
Python is popular among data scientists and analysts for its simplicity and rich ecosystem of libraries. PySpark allows these professionals to leverage Spark's distributed computing power while working in a familiar language.
What is PySpark and why is it used?
PySpark is used for big data processing, machine learning at scale, real-time stream processing, and complex data analytics tasks that require distributed computing.
How is PySpark different from Python?
PySpark is not a different version of Python, but rather a library that allows Python to interface with Spark. It provides Python APIs for Spark's core functionalities and allows distributed processing, which standard Python doesn't offer out of the box.
What is the basic architecture of PySpark?
PySpark follows a master-worker architecture with a driver program, cluster manager, and worker nodes running executors.
Is PySpark easy to learn?
If you're already familiar with Python, learning PySpark is relatively straightforward. However, understanding distributed computing concepts and Spark's execution model takes time and practice.
Is PySpark better than Pandas?
PySpark is better for large datasets that don't fit into memory and require distributed processing. For smaller datasets that fit in memory, Pandas might be faster and easier to use.
Can PySpark handle real-time data processing?
Yes, PySpark includes Spark Streaming and Structured Streaming modules for real-time data processing.


